It is always so much fun dressing up your stuffed animals with various accessories and clothing items! You can find the free crochet pattern for the Boucle Bear and Bunny HERE and the detailed step-by-step tutorial HERE! I will continue to update this blog post as we create more accessories for these adorable amigurumi. Note that the PDF for purchase HERE includes the Bunny and Bear patterns as well as the Christmas hat and headband patterns!
*******************
CHRISTMAS HAT (for Bear, meant to be worn lopsided to cover one ear)
Materials:
- 5 mm hook
- Red aran worsted weight yarn (level 4); I used Stitch & Story’s “The Lil’ Merino” in “Tulip Red”
- White faux fur yarn (super bulky level 6); I used Lion Brand Yarn’s “Go For Faux” in “Baked Alaska”
Pattern:
Using red yarn and 5 mm hook,
Chain 35. Join with slip stitch to first chain, being careful not to twist the chain.
Round 1: Chain 1, sc in next st and around. (35 sts)
We will be working in a continuous spiral so you do not need to close your rounds with a slip stitch (this means there is no visible seam created).
R2: Sc 35.
R3: *Sc 5, Dec*, rep 5 times. (30 sts)
R4: Sc 30.
R5: *Sc 4, Dec*, rep 5 times. (25 sts)
R6: *Sc 3, Dec*, rep 5 times. (20 sts)
R7: *Sc 2, Dec*, rep 5 times. (15 sts)
R8: Sc 15.
R9: *Sc 1, Dec*, rep 5 times. (10 sts)
R10: Sc 10.
R11: *Dec*, rep 5 times. (5 sts). Fasten off and weave in end.
Flip hat upside down. Attach white fluffy yarn and single crochet around edge in a counter clockwise direction (we want the “wrong” side of the fluffy stitches on the outside of the hat as it is more fluffy). To do so, make a slip knot. Insert your crochet hook into any stitch around edge. Add the slip knot and pull through. Chain 1 and work single crochets around in each stitch. Slip stitch to beginning chain 1, fasten off and weave in end.
Final dimensions: 10.5”/27 cm circumference, 3”/7.6 cm tall
Add a small yarn pom pom or crochet a faux fur pom pom (crochet a small ball using faux fur yarn):
Using fluffy yarn and 5 mm hook,
R1: Sc 6 in Magic Ring. (6 sts)
R2: Sc 6. (6 sts)
Fasten off, weave tail through 6 sts and pull tight. Attach to top of hat and weave in ends.
***********************
CHRISTMAS HEADBAND (for Bunny)
Materials:
- 5 mm and 8 mm hooks
- Red aran worsted weight yarn (level 4); I used Stitch & Story’s “The Lil’ Merino” in “Tulip Red”
- White faux fur yarn (super bulky level 6); I used Lion Brand Yarn’s “Go For Faux” in “Baked Alaska”
PATTERN:
* Headband
Using white fluffy yarn and 8 mm hook,
Chain 23. Join with slip stitch to first chain, being careful not to twist the chain.
Round 1: Chain 1, sc in next st and around. (23 sts)
We will be working in a continuous spiral so you do not need to close your rounds with a slip stitch (this means there is no visible seam created).
R2: Sc 23. (You can repeat R2 until your desired thickness – I only crocheted two rounds).
Slip st to next st, fasten off and weave in end.
*Bow Main Piece (worked in rounds)
Using red yarn and 5 mm hook,
Chain 18. Join with slip stitch to first chain, being careful not to twist the chain.
Round 1: Chain 1, sc in next st and around. (18 sts)
We will be working in a continuous spiral so you do not need to close your rounds with a slip stitch (this means there is no visible seam created).
R2-5: Sc 18.
Slip st to next st, fasten off and weave in end.
*Bow Middle Strip (worked flat in turned rows)
Using red yarn and 5 mm hook,
Chain 3.
Row 1: Starting in second st from hook, sc across . (2 sts)
R2: Chain 1, turn. Starting in second st from hook, sc across. (2 sts).
R3-5: Repeat Row 2.
Fasten off and leave long end for sewing.
Wrap middle strip around main piece (try to position the beginning and end of the bow main piece rounds towards the middle back so it gets hidden behind the bow middle strip). Whip stitch short ends together on the back of the bow. Use same yarn tail to seam the bow to the fluffy white headband, tilting the bow at a bit of an angle (so bow is slightly tilted when headband is worn). Weave in ends.
Final dimensions: 11.5”/29 cm around, 1.25”/3 cm tall
*******************
KNIT RAGLAN SWEATER
I have always wanted to try knitting a raglan sweater as this technique has been on my to-try bucket list! I had the “Itty Bitty Raglan” sweater pattern by Christie Bodden Designs in my Ravelry library, so I thought it would be the perfect chance to try making one! Fun fact: I met Christie at the Our Maker Life 2019 event in Calgary when I was one of the keynote speakers – she is so vibrant, welcoming and full of energy, and I am thankful that I could work through one of her patterns! You can find the Itty Bitty Raglan pattern in her Etsy store HERE. I would love to make one for a baby or toddler as this technique was a lot of fun! Note that if you are looking for a crochet raglan sweater, a reader said she followed a design by Daisy Farm Crafts – they offer many adorable crochet baby sweater patterns HERE!
Here are my modifications:
- I followed the Newborn size.
- I used 3.5 and 3.75 mm knitting needles with circular needles (you can use the magic loop technique or use DPN’s if you own them).
- I used Wool-Ease in “Fisherman” (level 4 worsted weight yarn).
- Instead of garter, I switched to stockinette stitch.
- I tried the sweater on Teddy as I went so I could see where I wanted the sweater to hit him and where I wanted the sleeves to end. I shortened the length of the sweater by doing fewer rounds and also shortened the length of the sleeves.
I recently learned the duplicate stitch (also known as Swiss Darning), which is a very neat technique where you add a decorative stitch over stockinette stitch. You use a contrasting color to sew over your knitting and duplicate the stitches. I learned how to do the duplicate stitch through YouTube videos (such as this helpful one HERE) and absolutely love this technique! I adore how you can add a design after the project has been knit rather than having to switch colors throughout the project. You can add any design you want, and I wanted to add a lovely T for Teddy!
Here are my duplicate stitch tips:
- Use a yarn of similar thickness (or slightly thicker) so that you can successfully duplicate the stitches underneath (if it is too thin, you will still be able to see the stitch underneath).
- Do not pull too tightly as this will cause the stitch to shrink and once again not duplicate the stitch underneath successfully. You can loosen the stitches as you go if you need more slack.
- Use stitch markers as a guide to help you determine where the middle of the piece is and where you want to start working the duplicate stitch.
- Try to work from the bottom of the design and upwards (rather than top down) so that you do not need to work over the stitches you have already duplicated.
- I made a quick TikTok video showing me working the duplicate stitch on Teddy’s sweater HERE!
- You can check this resource HERE to see different letters for the duplicate stitch.
*****************************
SCARVES
Materials:
- 2.75 mm hook
- Red and white yarn, level 2 (sport/baby) yarn
Solid Scarf:
Ch 88 (optional: leave long initial end to become part of the fringe).
Row 1: Starting in second ch from hook, sc across. (87)
R2: Chain 1, turn. Starting in second st from hook, sc in front loops only (87)
R3-4: Repeat Row 2.
Fasten off and leave long end to become part of the fringe.
Final dimensions: 14″/36 cm long, 0.8″/2 cm wide
Striped Scarf:
- After every two rows, switch colors.
- To switch the yarn colour: work last stitch in old color – work as if typical single crochet until two stitches are left on the hook (i.e. insert hook into stitch, yarn over, pull up a loop). Use new color to yarn over and pull through both loops. Continue crocheting using new color.
- When working colour changes, you do not need to cut the yarn. Simply drop the colour you are not using and pick it back up when you need it again during subsequent rows. I carried the yarn across so I did not need to cut the yarn and weave in the ends later on – this leaves a visible edge but it kind of resembles a swirly candy cane! Since you are switching colors after completing every two rows, the yarn gets carried along the same side.
- I did a total of 45 color blocks.
Using first color,
Chain 6.
Row 1: Starting in second ch from hook, sc across. (5 sts)
Row 2: Chain 1, turn. Starting in second st from hook, sc across. (5 sts)
Switch to second color,
Row 3: Repeat Row 2.
Row 4: Repeat Row 2.
Keep repeating and switching colors until desired length (I continued until Row 90, so there were 45 color blocks).
Fasten off and leave long end to become part of the fringe.
Final dimensions: 14″/36.5 cm long, 0.9″/2.4 cm wide
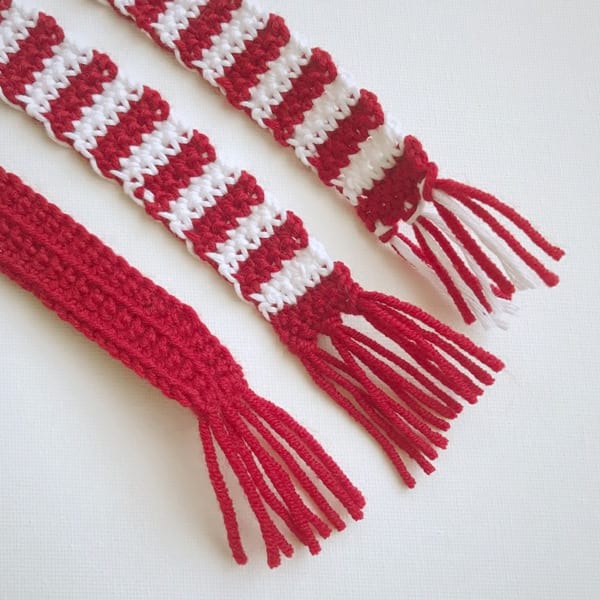
Adding Fringe:
Cut 6″/15 cm strands of yarn – I used 8 strands for the solid scarf and 12 strands for the striped scarf (you can either mix the colors or use the same color). Fold the strands in half. Insert a crochet hook into a space at the bottom, from wrong side to right side. Pull folded loop of strand through. Pull tips of the strands through the loop. Pull tightly and repeat this process across the bottom edge, for both sides.
For the solid scarf, I used 4 strands of fringe on each side. For the striped scarf, I had 3 bundles for each side (you can either use all the same color or hold one strand of each color for each bundle). You can block the fringe and trim to your desired length (my fringe was approximately 1.5″/3.8 cm long).
************************
BUCKET HAT FOR TEDDY
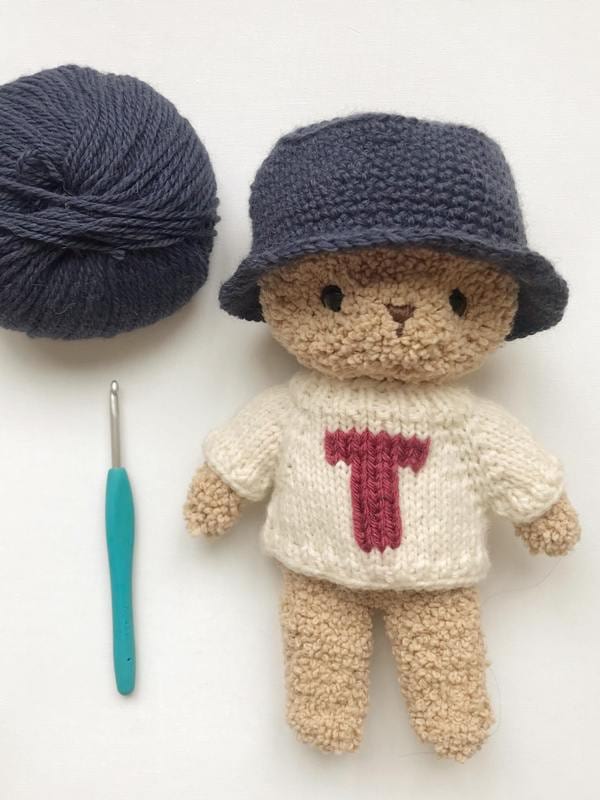
Materials:
- Worsted weight yarn (level 4 yarn): I used “Merino Yak Alpaca” in “Navy” from the LB Collection (~20 grams)
- 4.5 mm hook
R1: 6 sc in Magic Ring. (6 sts)
R2: *Inc*, rep around. (12 sts)
R3: *Sc 1, Inc*, rep 6 times. (18 sts)
R4: *Sc 2, Inc*, rep 6 times. (24 sts)
R5: *Sc 3, Inc*, rep 6 times (30 sts)
R6: *Sc 4, Inc*, rep 6 times (36 sts)
R7: *Sc 5, Inc*, rep 6 times (42 sts)
R8: *Sc 6, Inc*, rep 6 times (48 sts)
R9: In back loops only, Sc 48. (48 sts)
R10-19: Sc 48
R20: *Sc 3, Inc*, rep 12 times. (60 sts)
R21: *Sc 3, Inc*, rep 15 times. (70 sts)
R22: Sc 75.
Slip st to next st. Fasten off and weave in end.
*************************
Note that if you are looking for more clothing and accessories options for the Boucle Bear and Bunny, you can search stores and websites for doll clothes! The pink tutu that Rosie the Bunny is wearing is from one of Myla’s dolls from Walmart. It is so much fun dressing these amigurumi up, and the possibilities are endless, from raincoats and boots to overalls and dresses! Enjoy these garments and accessories, everyone!