***You can purchase an INEXPENSIVE AD-FREE PDF of this pattern on Etsy HERE! This beautifully formatted PDF includes the step-by-step pictures and is a total of 4 pages including the cover page.
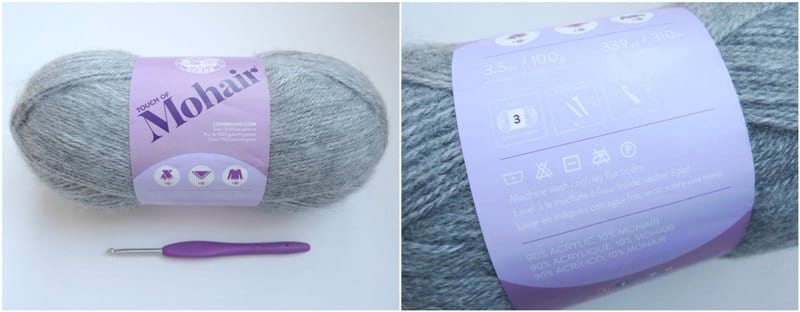
I love Lion Brand Yarn’s “Touch of Mohair” yarn as it is a soft lightweight level 3 yarn with a beautiful halo/fuzz to it. It is 90% acrylic/10% mohair, and there are 100 grams per skein. You may remember that I used this yarn to knit my Longbourn Scarf using three different shades (grey, cream and taupe), and this time I wanted to try crocheting a beanie with it! I opted to use the classic “Oxford Grey” shade with my 4 mm hook. This beanie requires less than one skein of yarn, and I know we all love a good one skein project!
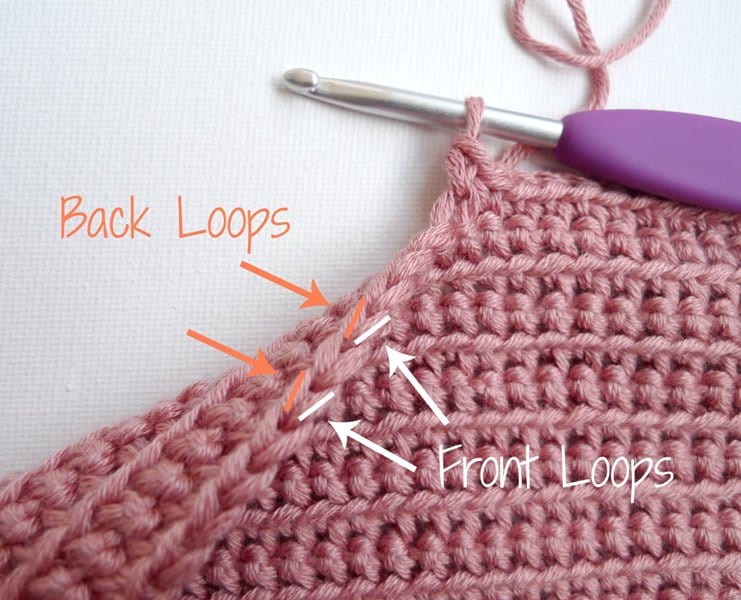
I wanted to design a simple beanie with a ribbed look, so I turned to an easy stitch that gives beautiful results: single crocheting in the front loops only. I used this technique in my Rosewood Cardigan, and you can see where the back and front loops are located in this picture below that is taken from the Rosewood Cardigan tutorial. The front loops are the ones closest to you while the back loops are the ones further away from you. This stitch pattern gives a smooth fabric with beautiful horizontal lines resulting from leaving the back loops unworked.
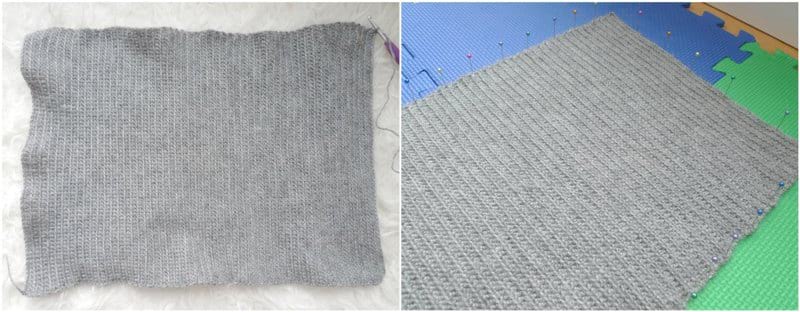
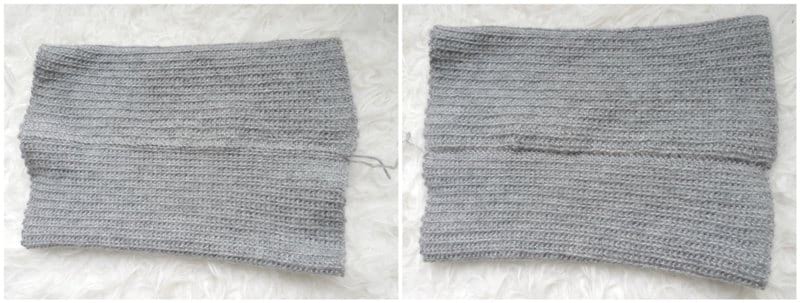
This beanie is extremely simple to crochet as all you need to do is crochet a rectangle by single crocheting in the front loops only in turned rows. I blocked my rectangle when I was finished crocheting it by pinning it onto foam mats and blasting it with hot steam from my trusty steamer. However, it is not a necessity to block your rectangle since you will be seaming the rectangle and closing up the top (does not need to be perfectly flat).
It is now time to assemble your beanie! Fold the rectangle in half width-wise and seam the short ends together by whip stitching the back loops of one edge to the front loops of the other edge.
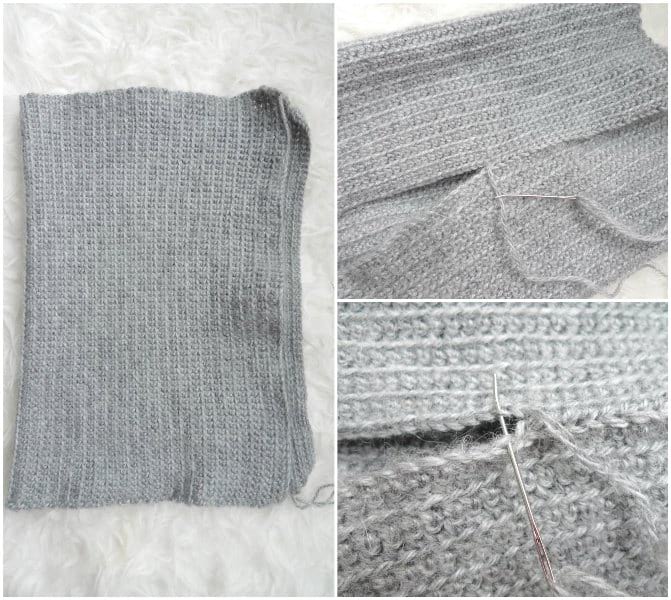
You have now formed a tube. Flip the tube inside out to make the seam less visible.
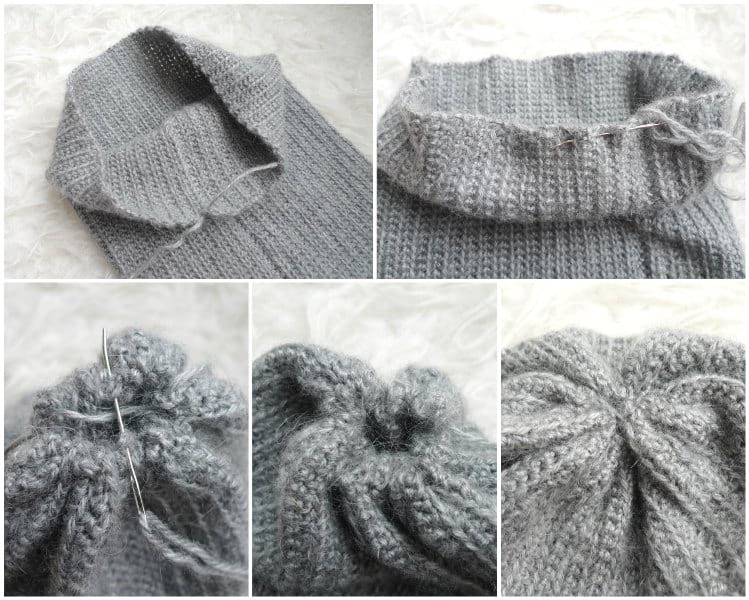
It is now time to close up the top. Thread your yarn needle in and out of the edge of the opening and pull tight to cinch the opening shut. Use the yarn needle to close up any holes that may remain to ensure the top is completely cinched shut.
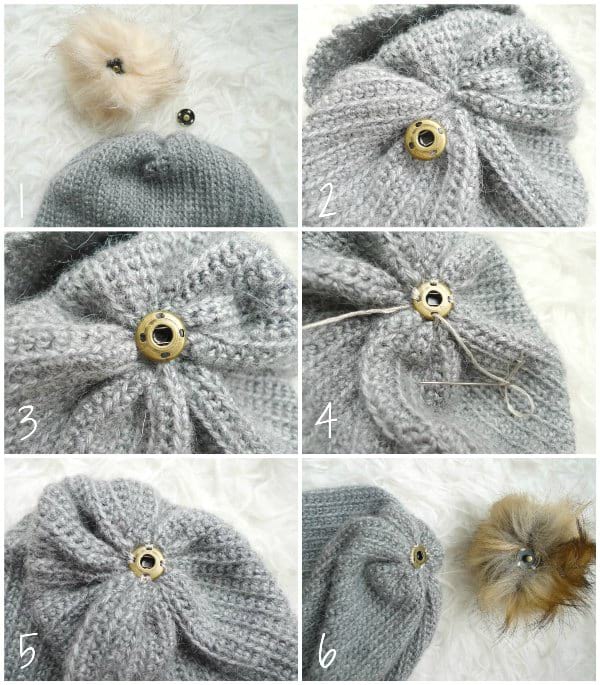
Adding a pom pom (either yarn or faux fur) helps to conceal the cinched top. I LOVE these faux fur pom poms with antique bronze press buttons that I purchased on Amazon! They come in a set of 12 with 6 different colors and are 4.3″ in diameter. The press buttons mean that you can easily remove the faux fur pom poms when you want to wash the beanie, if you want to wear it sometimes without a pom pom, or if you want to switch to different colors. I am so glad I discovered these handy press button pom poms as they are so much fun to use, and they are very secure (no more floppy pom poms)! Here are the instructions on how to attach them:
- Get your materials ready: the beanie, press button, faux fur pom pom, embroidery floss, and yarn needle.
- Make sure your press button is oriented the correct way (test it out with the faux fur pom pom to make sure it works and is facing the right way).
- Position the press button right in the center of the top of the beanie (where the opening was cinched shut).
- Use embroidery floss and a needle to sew the press button securely into place. There are 4 holes, and I went through each one about 2-3 times.
- The press button has been secured into place. Hide any embroidery floss ends.
- The faux fur pom pom is ready to be attached! Switch to different colors depending on your outfit and mood. If you choose a neutral color for your beanie, all the various faux fur pom pom colors will match!
******************************************
Here is the free pattern for the Rosewood Beanie:

Materials:
- 4 mm Clover Amour hook
- Touch of Mohair Yarn – level 3 lightweight yarn (approximately 80 grams) – I used the colorway “Oxford Grey”
- Yarn needle
- Ultraleather garment tag by Brickbubble (optional)
- Detachable faux fur pom pom with press buttons
- {If you are interested in my “Orolay Women’s Winter Casual Mid Length Down Coat with Hood” as worn in these photos, click HERE! I got the beige in size Small, and am 5’6 for reference.}
Gauge: 23 sts and 23 rows = 4″ (single crochet worked in FLO)
Notes:
- A flat rectangle is created by working single crochets in the front loop only (FLO) in turned rows.
- Each single crochet stitch is comprised of two loops that form a V at the top: the front loops and the back loops. The front loops are the loops that are closest to you.
- Keep in mind that the number of initial stitches equates to the height of the hat (including the folded up brim). If you would like to make the hat shorter, decrease the amount of initial chains. If you would like to make the hat taller, increase the amount of initial chains.
- The number of rows equates to the circumference of the hat. If you would like the hat to be tighter/smaller in circumference, decrease the number of rows. If you would like the hat to be wider/larger in circumference, increase the number of rows.
- The rectangle is seamed along the short end to create a tube.
- The top of the tube is cinched closed by weaving a yarn needle and yarn tail through the opening. Any gaps at the top are stitched shut.
- A press button is sewed onto the top of the beanie so that you can wear it with different colored faux fur pom poms.
- The brim of the hat can be folded upwards to various widths to give a slouchy or more fitted look.
Using 4 mm hook, chain 71.
Row 1: Starting in second chain from hook, sc across. (70 sts)
Row 2: Chain 1, turn. Starting in second st from hook, sc in front loops only. (70 sts)
R3-104: Repeat Row 2.
Fasten off and leave long end for sewing. Resultant rectangle is 18″ (46 cm) long and 12″ (30 cm) high.
Assembly:
Fold rectangle in half and get ready to whip stitch the short ends together (blocking the rectangle flat with hot steam is optional). Using yarn tail and bent tip tapestry needle, whip stitch back loops of one side to front loops of the other side. Flip tube inside out to make the seam less visible. Using yarn tail, weave needle in and out of the edges of the rows where the opening is located. Once yarn tail has gone around the entire circular opening, pull tight to cinch the opening shut. Use the yarn tail and needle to close up any gaps that are still remaining.
Adding faux fur pom pom:
Position one end of the press button onto the middle top of the hat (where the opening has been cinched shut). Using embroidery floss and needle, sew the press button into place. Attach the faux fur pom pom to the top of the hat by pushing the press buttons into place. You can easily remove the pom pom if you need to wash the beanie, or if you would like to switch to a pom pom of a different color!
Different Sizes: If you would like to size this hat for different ages, you can reference this blog post for hat sizing measurements. I would approximate that a child hat would require about 60 stitches and 86 rows and a baby hat would require about 55 stitches and 80 rows using the same stitch pattern and assembly method.
Finished dimensions: 18″ (46 cm) circumference, 11″(28 cm) in height
[Note that the height of the finished beanie is shorter than the rectangle since the top is cinched shut. The final height can be adjusted depending on how widely you fold the brim/cuff upwards, e.g. can be folded to become 8-9″. Fold the brim more for a more fitted look, fold the brim less for a slouchier look.]
***Watch this short video below to see the making of the Rosewood Beanie:
**********************
How classic and sleek does the Rosewood Beanie look?
Isn’t it amazing how this gorgeous beanie is constructed from a simple rectangle?
The Rosewood Beanie is one of those winter wardrobe essentials that you can wear every single day. Since it uses a thinner yarn and is not bulky, it can also be worn indoors and will transition well into the spring or fall.
I purposely chose this brown faux fur pom pom to match with the faux fur lining of my hood! I love the versatility of being able to switch out the faux fur pom pom to a white, grey, lighter beige, or any color I want.
I love simple projects that give such sophisticated results, and I hope you do too! I worked on this beanie in the car, during pick-up, and while watching television. It is one of those projects that require little concentration since there is no increasing or decreasing, and it is easily transportable since it uses less than one skein of yarn.
I hope you enjoy crocheting your own Rosewood Beanies, and I cannot wait to see you rocking yours! If you like this design, don’t forget to subscribe to my e-mail newsletter HERE as you will get notified by e-mail whenever I publish a new post – I love sharing my designs with you all!

This pattern is an original pattern by Stephanie Lau of All About Ami. Please do not claim this pattern as your own. If you wish to share this pattern, you may link to this pattern but please do not reprint it on your site. You may keep a copy for your own personal use but please DO NOT sell the pattern or distribute it.
You may sell products made from this pattern but please clearly credit the design to me, Stephanie Lau of All About Ami, and provide a link to my blog www.AllAboutAmi.com. Permission is NOT granted for mass production or factory manufacturing of any kind. Thank you for being respectful and for your understanding!