***You can purchase an INEXPENSIVE AD-FREE PDF of this pattern on Etsy HERE! This beautifully formatted PDF includes the step-by-step pictures and pattern and is a total of 10 pages including the cover page! You can also find this pattern in my Easy & Modern Knits Pattern Bundle found HERE (includes over 35 of my knit patterns at a discounted price)! Lion Brand Yarn has made a convenient kit HERE that includes the pattern and all the Color Theory yarn needed to make this beautiful cardigan!
Pattern Description:
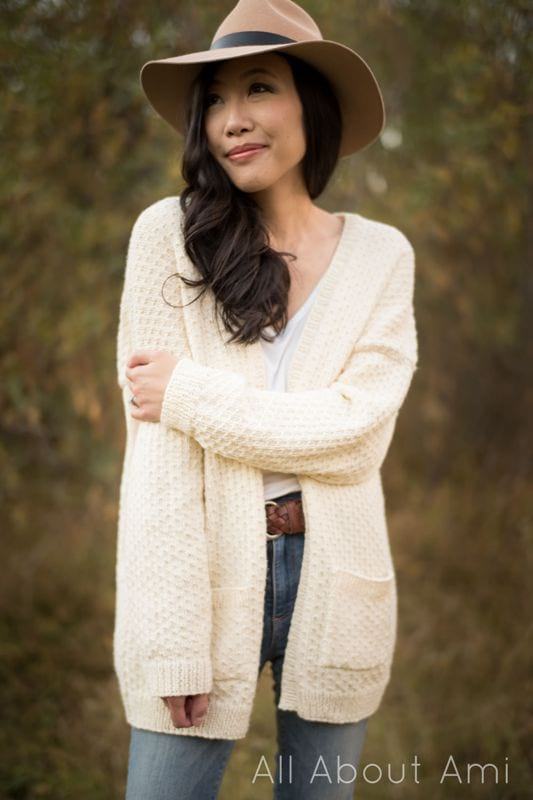
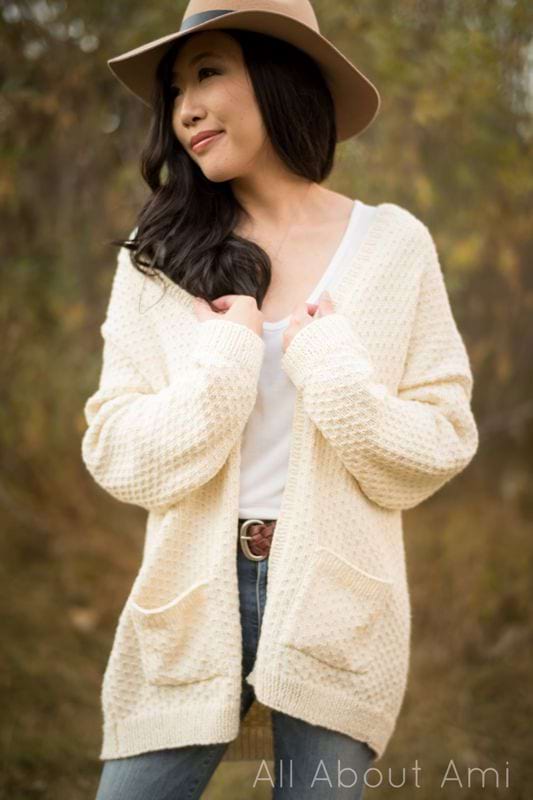
Knit this beautifully textured cardigan using worsted weight yarn and the delicate dot stitch! The Light Dotty Cardigan is a gorgeous drop-sleeve cardigan that looks so stylish with its ribbed collar, cozy pockets and lovely texture.
Materials:
- Color Theory Yarn (worsted weight level 4) in “Ivory”- see approximate yardage and number of skeins required below. Purchase the convenient KIT HERE that contains all the yarn you need!
- Clover Takumi 29″ 4.5 mm circular needles; 48″ cord for picking up stitches along collar
- Yarn needle
- O-ring stitch markers (for marking place in row) and lock ring stitch markers (for holding pieces together when seaming, checking for size)
Gauge: 19 stitches and 28 rows = 4 inches in dot stitch
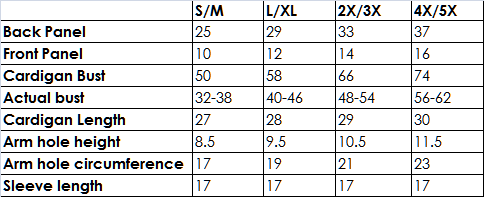
Final Measurements:
Approximate Yardage/Number of Skeins Required:
Small/Medium: 7 skeins, ~ 613 g/1508 yds
Large/XL: 8 skeins, ~ 747 g/1838 yds
2X/3X: 9 skeins, ~ 858 g/2110 yds
4X/5X: 10 skeins, ~ 985g/2423 yds
Pattern Notes:
- The initial cast on number for the dot stitch is a multiple of 4 stitches plus 3. The dot stitch is worked over a 4 row repeat, with the odd rows being purl all stitches.
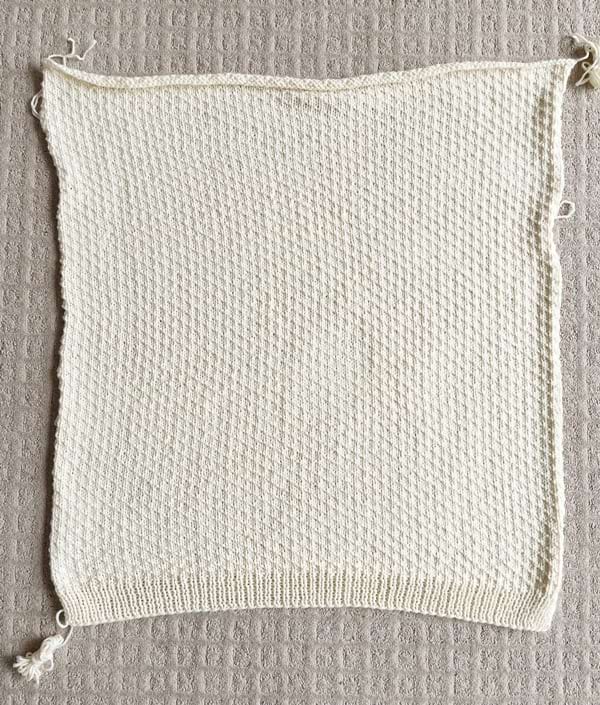
- This cardigan is worked in separate pieces and then seamed together. Pieces knit with the dot stitch have a tendency to curl, but this will not be noticeable once the pieces have been seamed together.
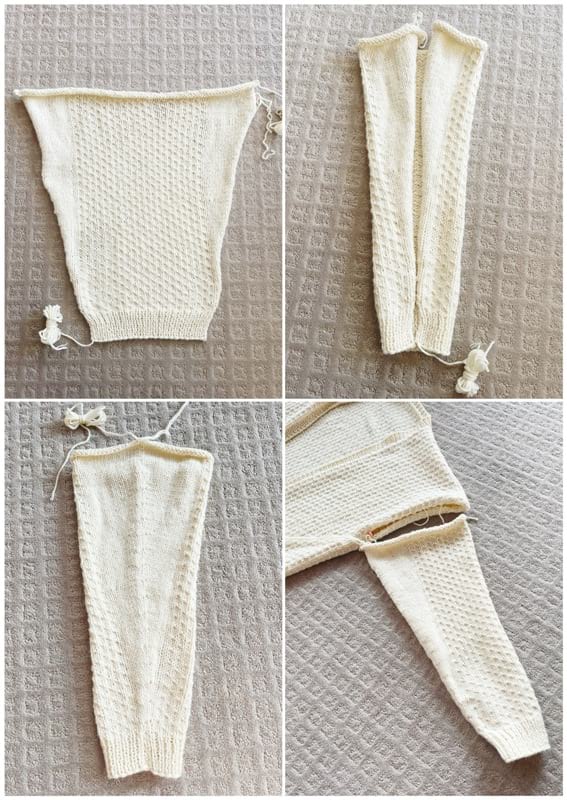
- One back panel and two front panels are knitted in the dot stitch and seamed together at the top and sides, leaving space for the arm holes. These panels are worked from the bottom up starting with the ribbing. Use the vertical invisible seaming technique when seaming together the sides of the back and front panels. Use the whip stitch when seaming the tops of the panels together.
- Once the back and front panels have been seamed together, stitches are picked up along the collar (3 out of every 4 stitches) and a ribbed pattern is worked. You can add more collar rows if you would like a thicker ribbed collar.
- The sleeves are worked from the bottom up, starting with the ribbing and then the dot stitch. The dot stitch is framed by stockinette stitches at the beginning and end of each row – the increases are worked in these stockinette sections (in the purl stitches of the stockinette specifically) so that the dot stitch pattern in the middle of the sleeves remains undisturbed. Stitch markers are used to help frame the dot stitch.
- The INCREASE ROW in the sleeve is worked as follows: {P1, PFB, P across until last two stitches. PFB, P1.} With this increase row, the stitch count increases by two stitches. The increases are always worked in the second stitch and second to last stitch. There are sixteen increases rows in total.
- The sleeves are seamed together using the vertical invisible seaming technique and then attached to the arm holes using the whip stitch. You can tentatively attach the sleeves to the arm hole using stitch markers so you can try on the cardigan and check whether you like the sleeve length. You can decrease the number of rows to make the sleeve shorter or increase the number of rows to make the sleeve longer depending on your preference.
- Whenever using the whip stitch, position the pieces so that the wrong sides are facing outwards towards you for a cleaner seam on the right side.
- Two pockets are knit starting with the dot stitch at the bottom and ribbing towards the top. They are then sewn onto the front panels, lining up the dot stitch of the pocket with the dot stitch of the front panel as best as possible.
Sizing Notes:
- This drop sleeve cardigan is oversized, relaxed, loose, and slouchy with 12-18” of positive ease built into the design. This means that if the actual bust of your body is 32″ (typically a size small), the bust of the size small sweater is 12-18″ larger (50″).
- Part of the front and back panels become part of the sleeve as they bend past the shoulders. The sleeve length remains the same for all sizes, but the increased width in the front and back panels help lengthen the sleeves of the larger sizes. The width of the sleeve varies by size.
- If you would like the cardigan to be wider, increase the number of stitches you cast on for the front and back panels (must be a multiple of 4 + 3). If you would like the cardigan to be narrower, decrease the number of stitches you cast on for the front and back panels.
- If you would like the cardigan to be longer, increase the number of rows for the back and front panels. If you would like the cardigan to be shorter, decrease the number of rows for the back and front panels.
- This pattern is written for the following sizes (I would recommend highlighting or circling the numbers for your size throughout the pattern): Small/Medium (Large/XL, 2XL/3XL, 4XL/5XL). Please note that for the stitch counts at the end of each row, the sizes are listed as follows (Small/Medium is first size after bracket): (Small/Medium, Large/XL, 2XL/3XL, 4XL/5XL).
- I am wearing a size Small/Medium. I am 5’6 for height reference.
Abbreviations:
- PFB = Purl Front and Back Increase: Step 1: Purl through the front loop as normal. Step 2: Before taking the stitch off the main needle, insert the tip of your working needle into the back loop and work a purl stitch. Remove the stitch from the needle – two stitches have been created. See how to work this increase HERE.
- PM = Place Marker: place marker at indicated spot (this is the first time you place the marker)
- SM = Slip Marker: slip the marker from left needle to the right needle
PATTERN:
***Back Panel:
We will begin with the ribbing.
Cast on 119 (139, 155, 175) stitches using long tail cast-on.
Row 1: *Purl 1, Knit 1* till last stitch. Purl last st. (119, 139, 155, 175)
R2: *Knit 1, Purl 1* till last stitch. Knit last st. (119, 139, 155, 175)
R3-11: Repeat Rows 1 and 2.
The ribbing is complete – we will now move onto the dot stitch section.
R12: K1. *P1, K3* repeat from * till last 2 stitches. P1, K1. (119, 139, 155, 175)
R13: Purl all stitches. (119, 139, 155, 175)
R14: K3. *P1, K3*, rep from * till end. (119, 139, 155, 175)
R15: Purl all stitches. (119, 139, 155, 175)
For S/M size:
R16-190: Repeat R12-15. (119) [You will end on a R14 repeat.]
Cast off all stitches purlwise. Leave long end for assembly.
For L/XL size:
R16-196: Repeat R12-15. (139) [You will end on a R12 repeat.]
Cast off all stitches purlwise. Leave long end for assembly.
For 2X/3X size:
R16-204: Repeat R12-15. (155) [You will end on a R12 repeat.]
Cast off all stitches purlwise. Leave long end for assembly.
For 4X/5X size:
R16-210: Repeat R12-15. (175) [You will end on a R14 repeat.]
Cast off all stitches purlwise. Leave long end for assembly.
***Front Panels (make 2):
We will begin with the ribbing.
Cast on 47 (59, 67, 75) stitches using long tail cast-on.
Row 1: *Purl 1, Knit 1* till last stitch. Purl last st. (47, 59, 67, 75)
R2: *Knit 1, Purl 1* till last stitch. Knit last st. (47, 59, 67, 75)
R3-11: Repeat Rows 1 and 2.
The ribbing is complete – we will now move onto the dot stitch section.
R12: K1. *P1, K3* repeat from * till last 2 stitches. P1, K1. (47, 59, 67, 75)
R13: Purl all stitches. (47, 59, 67, 75)
R14: K3. *P1, K3*, rep from * till end. (47, 59, 67, 75)
R15: Purl all stitches. (47, 59, 67, 75)
For S/M size:
R16-190: Repeat R12-15. (47) [You will end on a R14 repeat.]
Cast off all stitches purlwise. Leave long end for assembly.
For L/XL size:
R16-196: Repeat R12-15. (59) [You will end on a R12 repeat.]
Cast off all stitches purlwise. Leave long end for assembly.
For 2X/3X size:
R16-204: Repeat R12-15. (67) [You will end on a R12 repeat.]
Cast off all stitches purlwise. Leave long end for assembly.
For 4X/5X size:
R16-210: Repeat R12-15. (75) [You will end on a R14 repeat.]
Cast off all stitches purlwise. Leave long end for assembly.
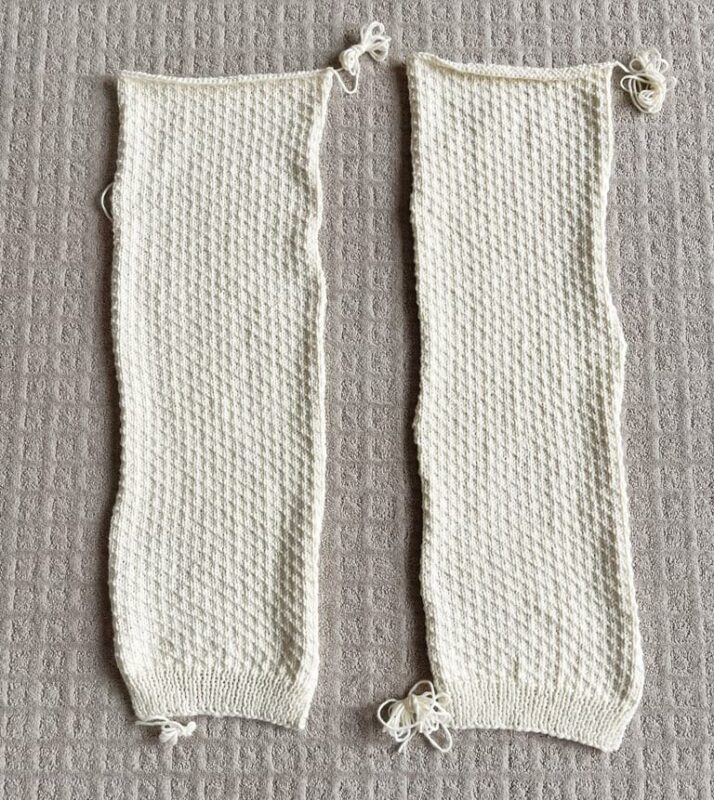
Assembly:
Whip stitch tops of front panels to back panel. Use the vertical invisible seaming technique to seam sides of front panels to back panel, making sure to leave an arm hole.
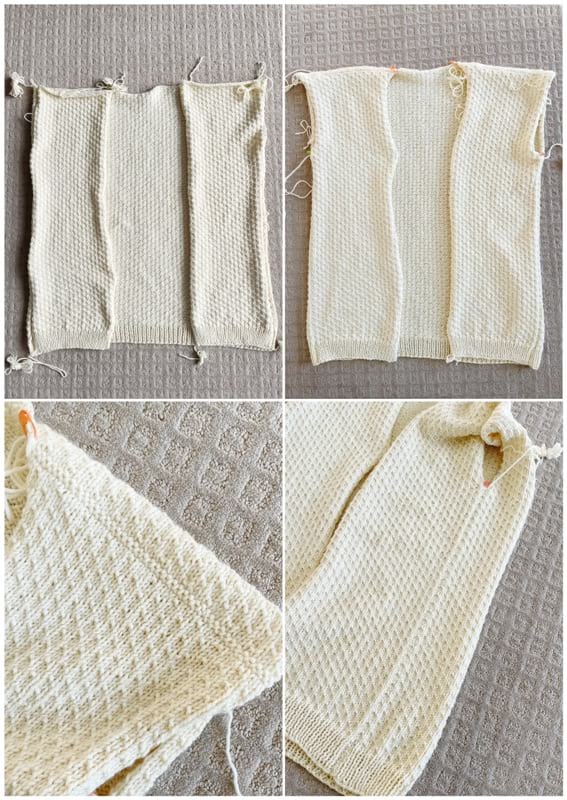
***Collar:
Starting in bottom left corner, pick up 3 out of every 4 stitches along the front panel, across the back panel (pick up every stitch for the back panel portion), and down the front panel. To pick up stitches using working yarn, insert your needle into the first stitch along the edge. Yarn over, then pull up a loop. Keep inserting your needle into the next stitch, yarning over, and pulling up a loop.
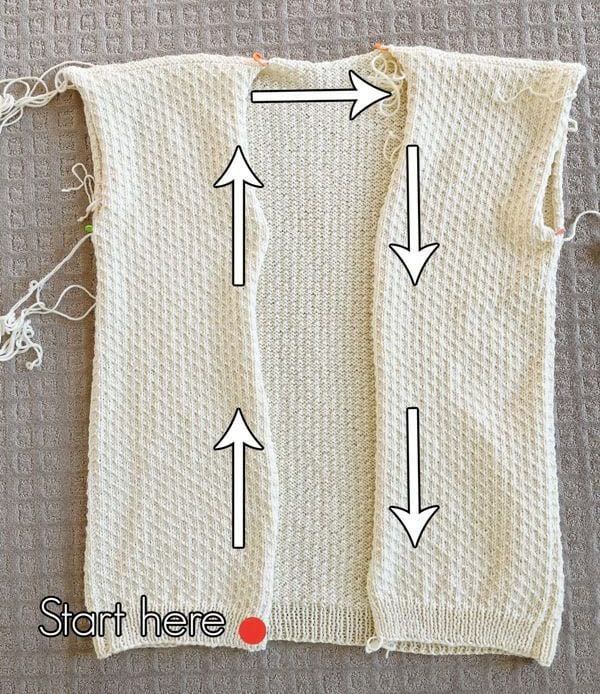
If even # of stitches:
Row 1: *K1, P1* across.
R2-7: Repeat Row 1.
If you would like to have a thicker ribbed collar, you can add more rows.
Cast off in ribbing and weave in ends.
If odd # of stitches:
Row 1: *P1, K1* till last stitch. Purl last stitch.
Row 2: *K1, P1* till last stitch. Knit last stitch.
R3-7: Repeat Rows 1 and 2.
If you would like a thicker ribbed collar, you can add more rows.
Cast off in ribbing and weave in ends.
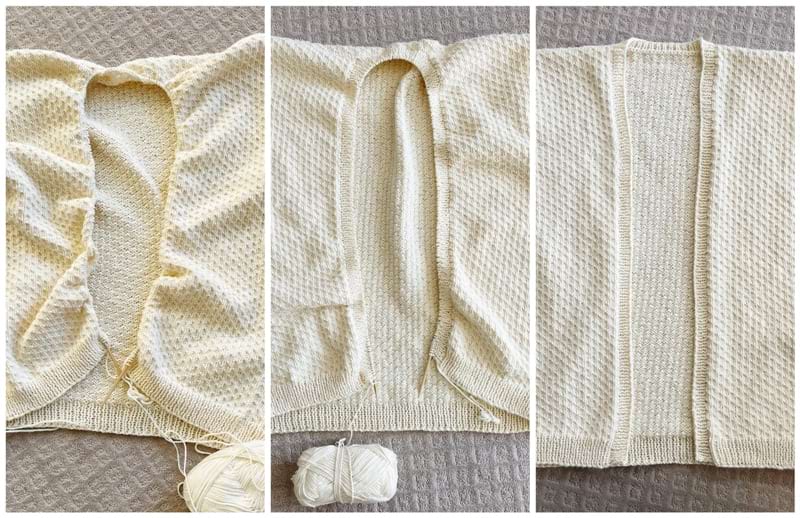
***Sleeves (make 2):
We will begin with the ribbing.
Cast on 47 (59, 67, 79) stitches using long tail cast-on.
Row 1: *Purl 1, Knit 1* till last stitch. Purl last st. (47, 59, 67, 79)
R2: *Knit 1, Purl 1* till last stitch. Knit last st. (47, 59, 67, 79)
R3-11: Repeat Row 1 and 2.
The ribbing is complete – we will now move onto the dot stitch section. Everything between the square brackets [ ] is the dot stitch worked exactly like the back and front panels. The dot stitch is framed by stockinette stitches (knit stitches on even rows, purl stitches on odd rows), and these stockinette stitches are where we will work the increases so that the dot stitch section within the [ ] remains undisturbed. We will use two stitch markers to indicate where the dot stitch section begins and ends for each row. For Row 12, the dot stitch is framed by two knit stitches on either end so that it looks like: Knit 2, Stitch Marker, Dot Stitch Section, Stitch Marker, Knit 2. For all odd rows (where you purl across), simply slip the stitch markers from one needle to the other needle.
R12: K2, PM. [K1, *P1, K3* rep from * till last 2 stitches of dot stitch portion/last 4 stitches in overall row. P1, K.] PM, K2. (47, 59, 67, 79)
R13: Purl all stitches. (47, 59, 67, 79)
R14: K2, SM. [K3, *P1, K3* rep from * across.] SM, K2. (47, 59, 67, 79)
We will now work our first increase row as described in the Notes section: {P1, PFB, P across until last two stitches. PFB, P1.} There will be 16 increase rows in total for the rest of the sleeve, and the increases are ONLY worked in the stockinette portion (before and after the stitch marker, NOT in the dot stitch section).
R15: WORK INCREASE ROW (#1). (49, 61, 69, 81)
R16: K3, SM. [K1, *P1, K3* rep from * till last 2 stitches before marker. P1, K1.] SM, K3. (49, 61, 69, 81)
R17: Purl all stitches. (49, 61, 69, 81)
R18: K3, SM. [K3, *P1, K3* across.] SM, K3. (49, 61, 69, 81)
R19: Repeat R17.
R20: Repeat R16.
R21: WORK INCREASE ROW (#2). (51, 63, 71, 83)
R22: K4, SM. [K3, *P1, K3* across.] SM, K4. (51, 63, 71, 83)
R23: Purl all stitches. (51, 63, 71, 83)
R24: K4, SM. [K1, *P1, K3* rep from * till last 2 stitches before marker. P1, K1.] SM, K4. (51, 63, 71, 83)
R25: Repeat R23.
R26: Repeat R22.
R27: WORK INCREASE ROW (#3). (53, 65, 73, 85)
R28: K5, SM. [K1, *P1, K3* rep from * till last 2 stitches before marker. P1, K1.] SM, K5. (53, 65, 73, 85)
R29: Purl all stitches. (53, 65, 73, 85)
R30: K5, SM. [K3, *P1, K3* across.] SM, K5. (53, 65, 73, 85)
R31: Repeat R29.
R32: Repeat R28.
R33: WORK INCREASE ROW (#4). (55, 67, 75, 87)
R34: K6, SM. [K3, *P1, K3* across.] SM, K6. (55, 67, 75, 87)
R35: Purl all stitches. (55, 67, 75, 87)
R36: K6, SM. [K1, *P1, K3* rep from * till last 2 stitches before marker. P1, K1.] SM, K6. (55, 67, 75, 87)
R37: Repeat R35.
R38: Repeat R34.
R39: WORK INCREASE ROW (#5). (57, 69, 77, 89)
R40: K7, SM. [K1, *P1, K3* rep from * till last 2 stitches before marker. P1, K1.] SM, K7. (57, 69, 77, 89)
R41: Purl all stitches. (57, 69, 77, 89)
R42: K7, SM. [K3, *P1, K3* across.] SM, K7. (57, 69, 77, 89)
R43: Repeat R41.
R44: Repeat R40.
R45: WORK INCREASE ROW (#6). (59, 71, 79, 91)
R46: K8, SM. [K3, *P1, K3* across.] SM, K8. (59, 71, 79, 91)
R47: Purl all stitches. (59, 71, 79, 91)
R48: K8, SM. [K1, *P1, K3* rep from * till last 2 stitches before marker. P1, K1.] SM, K8. (59, 71, 79, 91)
R49: Repeat R47.
R50: Repeat R46.
R51: WORK INCREASE ROW (#7). (61, 73, 81, 93)
R52: K9, SM. [K1, *P1, K3* rep from * till last 2 stitches before marker. P1, K1.] SM, K9. (61, 73, 81, 93)
R53: Purl all stitches. (61, 73, 81, 93)
R54: K9, SM. [K3, *P1, K3* across.] SM, K9. (61, 73, 81, 93)
R55: Repeat R53.
R56: Repeat R52.
R57: WORK INCREASE ROW (#8). (63, 75, 83, 95)
R58: K10, SM. [K3, *P1, K3* across.] SM, K10. (63, 75, 83, 95)
R59: Purl all stitches. (63, 75, 83, 95)
R60: K10, SM. [K1, *P1, K3* rep from * till last 2 stitches before marker. P1, K1.] SM, K10. (63, 75, 83, 95)
R61: Repeat R59.
R62: Repeat R58.
R63: WORK INCREASE ROW (#9). (65, 77, 85, 97)
R64: K11, SM. [K1, *P1, K3* rep from * till last 2 stitches before marker. P1, K1.] SM, K11. (65, 77, 85, 97)
R65: Purl all stitches. (65, 77, 85, 97)
R66: K11, SM. [K3, *P1, K3* across.] SM, K11. (65, 77, 85, 97)
R67: Repeat R65.
R68: Repeat R64.
R69: WORK INCREASE ROW (#10). (67, 79, 87, 99)
R70: K12, SM. [K3, *P1, K3* across.] SM, K12. (67, 79, 87, 99)
R71: Purl all stitches. (67, 79, 87, 99)
R72: K12, SM. [K1, *P1, K3* rep from * till last 2 stitches before marker. P1, K1.] SM, K12. (67, 79, 87, 99)
R73: Repeat R71.
R74: Repeat R70.
R75: WORK INCREASE ROW (#11). (69, 81, 89, 101)
R76: K13, SM. [K1, *P1, K3* rep from * till last 2 stitches before marker. P1, K1.] SM, K13. (69, 81, 89, 101)
R77: Purl all stitches. (69, 81, 89, 101)
R78: K13, SM. [K3, *P1, K3* across.] SM, K13. (69, 81, 89, 101)
R79: Repeat R77.
R80: Repeat R76.
R81: WORK INCREASE ROW (#12). (71, 83, 91, 103)
R82: K14, SM. [K3, *P1, K3* across.] SM, K14. (71, 83, 91, 103)
R83: Purl all stitches. (71, 83, 91, 103)
R84: K14, SM. [K1, *P1, K3* rep from * till last 2 stitches before marker. P1, K1.] SM, K14. (71, 83, 91, 103)
R85: Repeat R83.
R86: Repeat R82.
R87: WORK INCREASE ROW (#13). (73, 85, 93, 105)
R88: K15, SM. [K1, *P1, K3* rep from * till last 2 stitches before marker. P1, K1.] SM, K15. (73, 85, 93, 105)
R89: Purl all stitches. (73, 85, 93, 105)
R90: K15, SM. [K3, *P1, K3* across.] SM, K15. (73, 85, 93, 105)
R91: Repeat R89.
R92: Repeat R88.
R93: WORK INCREASE ROW (#14). (75, 87, 95, 107)
R94: K16, SM. [K3, *P1, K3* across.] SM, K16. (75, 87, 95, 107)
R95: Purl all stitches. (75, 87, 95, 107)
R96: K16, SM. [K1, *P1, K3* rep from * till last 2 stitches before marker. P1, K1.] SM, K16. (75, 87, 95, 107)
R97: Repeat R95.
R98: Repeat R94.
R99: WORK INCREASE ROW (#15). (77, 89, 97, 109)
R100: K17, SM. [K1, *P1, K3* rep from * till last 2 stitches before marker. P1, K1.] SM, K17. (77, 89, 97, 109)
R101: Purl all stitches. (77, 89, 97, 109)
R102: K17, SM. [K3, *P1, K3* across.] SM, K17. (77, 89, 97, 109)
R103: Repeat R101.
R104: Repeat R100.
R105: WORK INCREASE ROW (#16). (79, 91, 99, 111)
R106: K18, SM. [K3, *P1, K3* across.] SM, K18. (79, 91, 99, 111)
R107: Purl all stitches. (79, 91, 99, 111)
R108: K18, SM. [K1, *P1, K3* rep from * till last 2 stitches before marker. P1, K1.] SM, K18. (79, 91, 99, 111)
R109: Repeat R107.
R110-120: Repeat R106 – R109 (end on a R108 repeat).
Cast off all stitches purlwise and leave long end for assembly.
Assembly:
Fold each sleeve in half lengthwise and use the vertical invisible seaming technique to seam sides together. Whip stitch the tops of the sleeves to the arm holes.
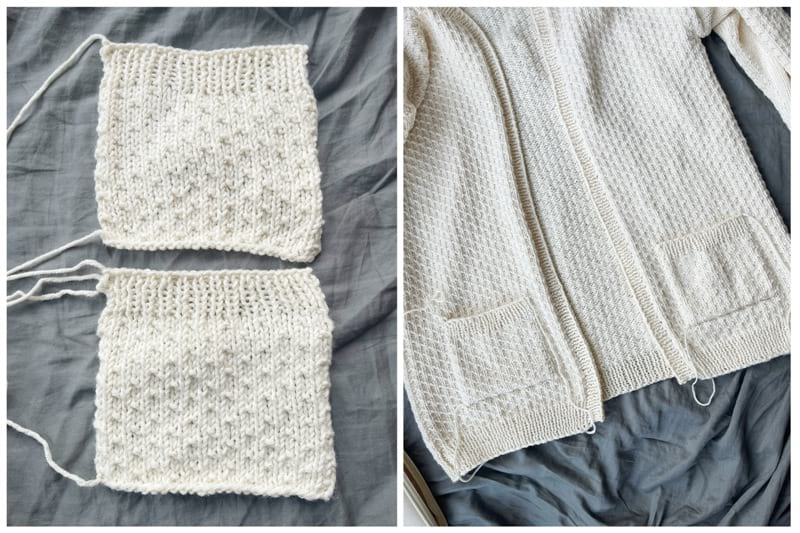
***Pockets:
Cast on 27 stitches.
R1: Purl all stitches (27).
R2: K1. *P1, K3* repeat from * till last 2 stitches. P1, K1. (27)
R3: Purl all stitches. (27)
R4: K3. *P1, K3*, rep from * till end. (27)
R5: Purl all stitches. (27)
R6-29: Repeat R2-5. (27)
R30: *Knit 1, Purl 1* till last stitch. Knit last st. (27)
R31: *Purl 1, Knit 1* till last stitch. Purl last st. (27)
R32-35: Repeat R30 and 31.
Cast off all stitches in rib pattern.
Fasten off and leave long end for sewing. Sew pockets onto front panels, trying to match up the dot stitch pattern of the pocket with the dot stitch pattern of the front panel as best as possible. I seamed my pocket approximately 1.5″/3.8 cm away from the ribbed collar and 1.5″/3.8 cm above the ribbing of the front panel.
*************************
I designed the original Dotty Cardigan back in 2019 using bulky level 5 yarn and the beautiful dot stitch. Since then, I have used the dot stitch for many scarf and beanie designs in a variety of yarn weights. In March 2020, I used the dot stitch for my Square 5 of the Traveling Knit Afghan. When I saw how gorgeous the dot stitch looked in worsted weight yarn, I thought it would be so lovely to have an entire cardigan that looked like that. However, there was no worsted weight yarn that I absolutely loved that had beautiful stitch definition AND felt amazing against the skin. Fast forward to May 2022, and Color Theory yarn was released! As soon as I worked up a swatch, I KNEW that this was the yarn that I wanted to use for the Light Dotty Cardigan!
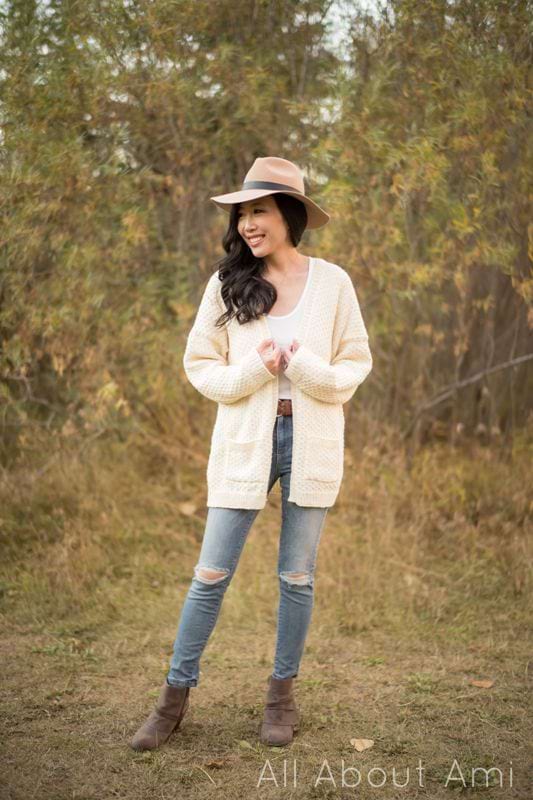
Doesn’t the dot stitch look so delicate and elegant? The classic “Ivory” color really showcases the lovely texture. I wanted to choose this colorway so that it would match with any outfit! I love how worsted weight cardigans can be worn year-round whereas chunkier cardigans are typically for colder weather!
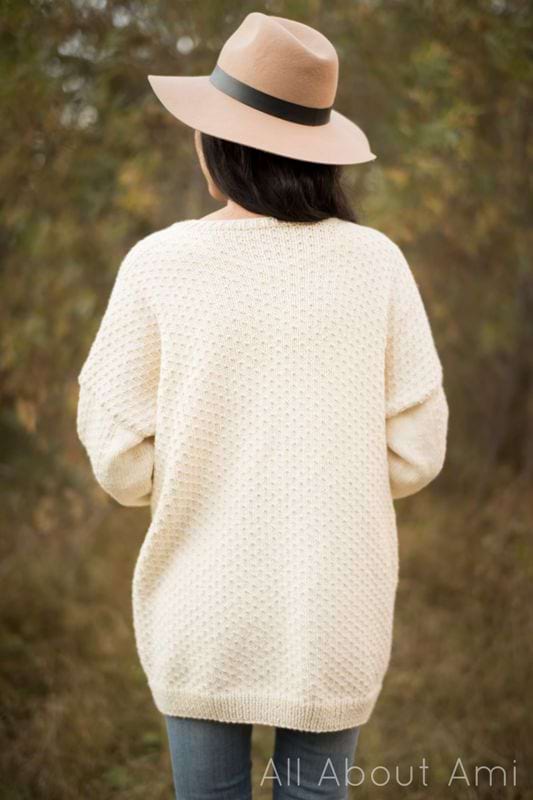
The Light Dotty Cardigan has gorgeous drape and I hope you will love adding this garment to your handmade wardrobes! You can customize it with any color you want, add/decrease length, make the collar wider or add/omit pockets. Once you fall into the rhythm of the dot stitch, it is so fun watching the lovely dots build up!
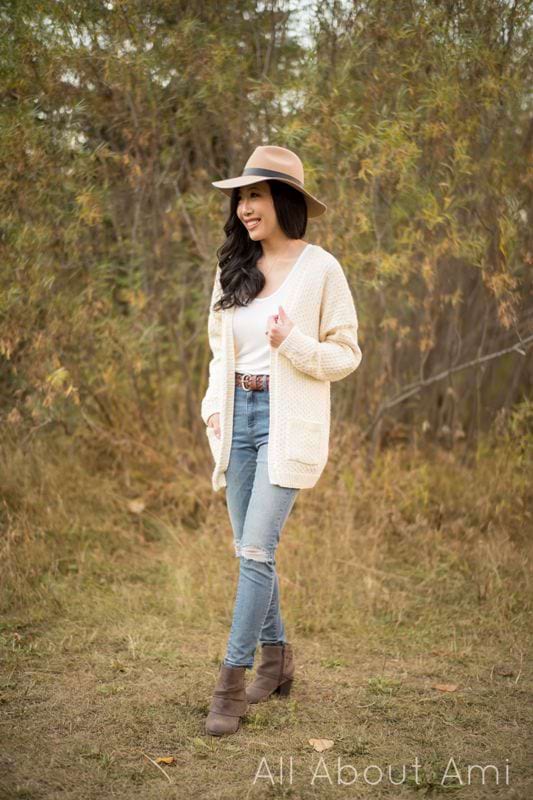
I hope you enjoy knitting your Light Dotty Cardigans! You can use the hashtag #lightdottycardigan when posting your work-in-progress photos and finished cardigans. I have wanted to make a lighter weight version of my Dotty Cardigan for so long, and I am very thankful that I waited for the perfect yarn! There are so many gorgeous shades to choose from, and Color Theory yarn works up beautifully. Once again, you can purchase the kit on the Lion Brand Yarn site HERE (you can watch out for deals as they frequently have promo codes)!

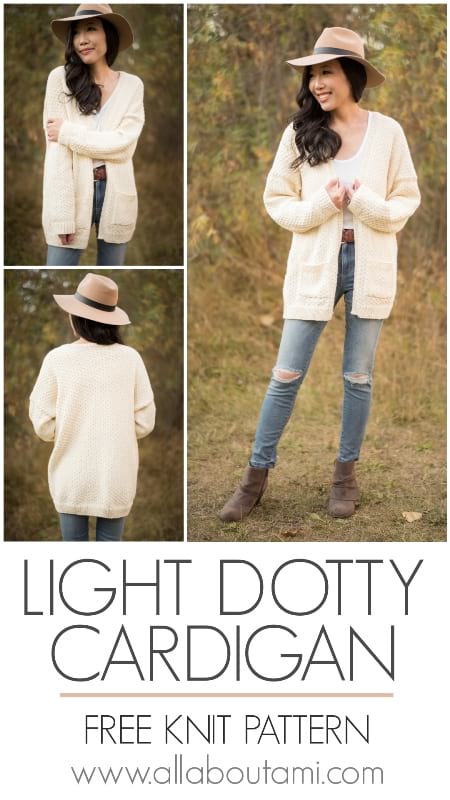
Stay warm and happy knitting, my friends! You can pin the below image to your Pinterest boards to remind you about this project!
{This post is sponsored by Lion Brand Yarn! I’ve loved working with their yarn throughout the years and I’m thrilled that I get to collaborate with them every month!}
This pattern is an original pattern by Stephanie Lau of All About Ami. Please do not claim this pattern as your own. If you wish to share this pattern, you may link to this pattern but please do not reprint it on your site. You may keep a copy for your own personal use but please DO NOT sell the pattern or distribute it.
You may sell products made from this pattern but please clearly credit the design to me, Stephanie Lau of All About Ami, and provide a link to my blog www.AllAboutAmi.com. Permission is NOT granted for mass production or factory manufacturing of any kind. Thank you for being respectful and for your understanding!
