***You can purchase an INEXPENSIVE AD-FREE PDF of this pattern on Etsy HERE and on LoveCrochet HERE! This beautifully formatted PDF includes ALL the step-by-step pictures and pattern and is a total of 19 pages including the cover page! Lion Brand Yarn has made a convenient kit HERE that includes the pattern and all the 24/7 Cotton yarn needed (4 different shades available) to crochet this amazing backpack!
***The step-by-step tutorial has been divided into 3 parts- please reference the below blog posts for detailed photos and explanations:
- Part 1: Granny Square, Triangles, and Backpack Sides
- Part 2: Top and Bottom Edging & Bottom Base of Backpack
- Part 3: Inner cell phone pocket, Strap, and Tassel
***Join the Wildrose Backpack Crochet-Along HERE! Add this design to your Ravelry queue HERE!
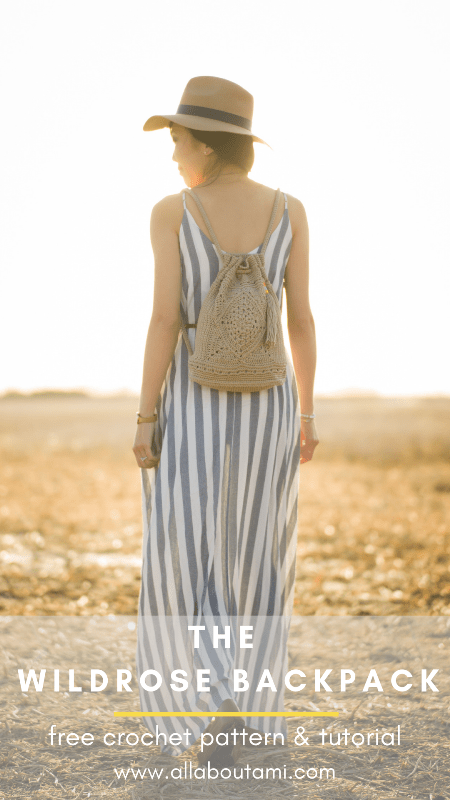
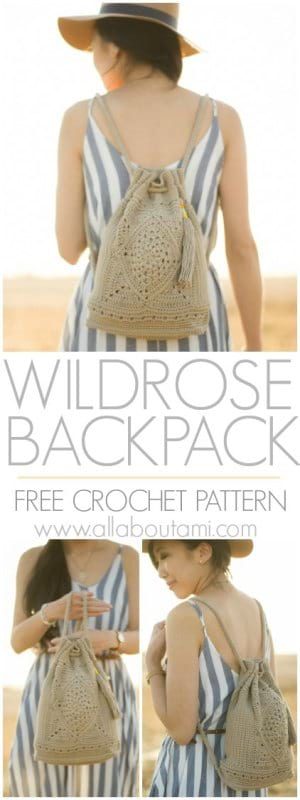
Pattern Description: Crochet this stunning Wildrose Backpack to hold your essentials on all your travels and adventures, from music festivals to the beach! The modern granny square is centered as a focal point with a variety of crochet stitches and techniques providing plenty of visual interest. The sturdy strap is part of the drawstring closure that allows for easy opening and closing of the backpack. An interior pocket holds your cell phone, and an optional tassel can be added for some pops of color!
Skill Level: Level 2 – Easy
Materials:
- 4 skeins of 24/7 Cotton in Taupe (worsted weight level 4 yarn); ~320 grams or 600 yards used
- 2.75 mm and 3.75 mm Clover Amour crochet hooks
- Yarn Needle (bent tip helpful for attaching)
- Lock ring stitch markers
- Embroidery floss (optional for tassel)
- Steamer (optional for blocking granny square and triangles- I use this affordable one HERE)
Gauge:
- Center granny square: 5” (12.7 cm) x 5” (12.7 cm)
- 18 sc + 20 rows = 4”/10 cm
Dimensions: 11”/28 cm wide, 12.5”/32 cm tall, 22”/56 cm circumference
Abbreviations:
- Magic Ring (MR): Make a loop. Hold yarn where ends cross. Insert hook into loop and pull up working yarn. Yarn over and work beginning chains. Work subsequent stitches in magic ring and then pull tight to close.
- Puff stitch (puff st): [YO, insert hook in next st, YO, pull up a loop], repeat 3 times in same st, YO, draw yarn through 7 loops on hook.
- Beginning cluster: Ch 3, [YO, insert hook in st or sp, YO, pull up a loop, YO, draw through 2 loops], rep 2 times in same st or sp, YO, draw through 3 loops on hook.
- Cluster: [YO, insert hook in st or sp, YO, draw up a loop, YO, draw through 2 loops on hook], rep 3 times in same st or sp, YO, draw through 4 loops on hook.
- Extended single crochet: Insert hook through next stitch. Pull up a loop and extend the loop to desired height (elongate it to match the height of the rest of the stitches). YO, pull through both loops on hook.
- Extended half double crochet: YO, insert hook through next stitch. Pull up a loop and extend the loop to desired height (elongate it to match the height of the rest of the stitches). YO, pull through 3 loops on hook.
- Half double crochet in third loops: When working half double crochets, three loops are created: a front loop, back loop, and third loop (located behind the front and back loops). Take note in the pattern where stitches are worked in the third loops.
- Reverse single crochet/crab stitch: Working from left to right (opposite direction you normally crochet), insert hook from front to back in stitch to the right. YO, pull up a loop, YO, pull through 2 loops on hook.
Notes:
- This backpack is constructed using a variety of crochet stitches and is segmented into different sections.
- First, the center granny square is crocheted along with four triangles.
- The four triangles are seamed to the granny square to create a large square.
- Next, turned rows are crocheted onto the sides of the large square to form the sides of the backpack. Once the desired width is achieved, the sides are whip stitched together along the back – a tube has now been formed.
- Stitches are picked up along the top and bottom of the tube to form the top and bottom edging. This edging is worked in joined rounds. Some of the rounds are worked with chain stitch gaps, and the crocheted strap will be woven through these gaps later on.
- Next, two rectangles are crocheted and sewn together to form the sturdy bottom of the backpack so that it does not bulge too much. These rectangles are then slip stitched onto the bottom of the tube.
- Lastly, a long tube is crocheted to form the strap. Both ends of the strap are woven into certain chain gaps to form the drawstring closure. Each end is then seamed onto the bottom back corner of the backpack. You may want to adjust the length of your strap depending on your height- I am 5’6 for reference.
- An optional tassel is created as a decorative touch for the backpack.
- Throughout the pattern, please take note whether you are working in turned rows or seamed rounds.
PATTERN INSTRUCTIONS
Center Granny Square (worked in rounds)
Using 3.75 mm hook
Round 1: Make Magic Ring. Chain 4 (counts as 1st double crochet and chain 1). *1 dc, ch 1*, rep 11 times in ring. Join with slip stitch to 3rd chain of beginning chain 4. (12 ch-1 spaces and 12 dc).
Round 2: Slip stitch into ch-1 space, Chain 3. *Puff st, chain 1* in each ch-1 space around. Join with slip stitch to 3rd chain of beginning ch-3. (12 puffs)
Round 3: Slip stitch 2 to get to ch-1 space. Work beginning cluster in space. [*Ch 1, cluster* in next 2 ch-1 spaces, Ch 3. Cluster in next ch-1 sp]. Repeat everything between brackets [ ] 2 more times. *Ch1, cluster* in next 2 ch-1 spaces. Ch 3, slip stitch to 3rd chain of beg ch-3. (12 clusters).
Round 4: Slip stitch 2 to get to ch-1 space. Work beginning cluster in space. Ch 1, work cluster in next space, ch 1. In ch-3 space, work *cluster, ch 3, cluster*. [In next 2 ch-1 sps, work *ch 1, cluster*, Ch 1. In Ch-3 sp, work *cluster, ch 3, cluster*]. Repeat everything between brackets [ ] 2 more times. Ch 1, slip stitch to 3rd chain of beg ch-3. (16 clusters)
Round 5: Slip stitch 2 to get to ch-1 space, ch 3. Work 2 dc in same space. 3 dc in next ch-1 sp. [In next ch-3 sp, *3 dc, ch 3, 3dc*. 3 dc in next 3 ch-1 sp.]. Repeat everything between brackets [ ] 2 more times. In next ch-3 sp, *3 dc, ch 3, 3dc*. 3 dc in last chain space. Slip stitch to 3rd chain of beg ch-3. (60 dc)
Round 6: Ch 3 (counts as dc). Dc in each dc until you reach dc before Ch 3 (7 dc). Skip next dc, *3 dc, ch 3, 3 dc* in Ch-3 corner. [Skip next dc, dc across until reach dc before Ch 3 (13 dc). Skip next dc, *3 dc, ch 3, 3 dc* in ch-3 corner.]. Repeat everything between brackets [ ] 2 more times. Skip next dc, dc 5. Slip stitch to top of Ch 3. [76 dc]. Fasten off.
***Please watch the “Wildrose Granny Square” video tutorial below that shows you how to crochet the 6 rounds in this pattern (be sure to follow the Round 5 used for the Wildrose Backpack)! Note the following timestamps:
1:33 Round 1
3:08 Round 2
5:24 Round 3
8:46 Round 4
11:20 Round 5 (Wildrose Shoulder Bag)
13:16 Round 5 (Wildrose Backpack & Wildrose Market Bag)
15:18 Round 6 (Wildrose Backpack & Wildrose Market Bag)
18:20 Round 7 (Wildrose Market Bag)
Triangle (make 4- worked in rows)
Using 3.75 mm hook,
Make Magic Ring.
Row 1: Ch 3 (counts as first dc), work 2 dc in ring, Ch 2, 3 dc in ring. (6 dc)
Row 2: Ch 4, turn. 2 dc in same st. Work 1 dc in each dc until Ch-2 corner space. Work *2 dc, ch 2, 2 dc* in corner space. Work 1 dc in each dc until last st. Work 3 dc in last st. (14 dc).
Row 3: Repeat R2. (22 dc)
Row 4: Repeat R2. (30 dc).
Fasten off and leave long end for sewing.
Optional: Block center granny square and four triangles to ensure they are flat.
Position center granny square so that it is a diamond (one corner is pointing upwards and one corner is pointing downwards). Position 4 triangles on diagonal edges so that they form one large square. Flip the pieces upside down and begin attaching: whip stitch triangles to square, leaving front and back loops of center granny square untouched (attach triangles to horizontal bars on the back side of the granny square). To help anchor each triangle, you can use the ends from the triangles and tie knots at each corner of the granny square.
Backpack Sides:
We will now be picking up stitches along the side of the large square and working in turned rows to crochet the sides of the backpack.
Using 3.75 mm hook,
Row 1: Starting in right corner, pick up 32 single crochet stitches. To do so, make a slip knot. Insert your crochet hook into the right corner. Add the slip knot and pull through. Yarn over and chain 1. Insert your hook into an adjacent space, yarn over, pull up a loop, yarn over, pull through both loops to work a single crochet. Keep repeating this process to pick up 32 single crochets along the side edge of the large square. Work an extended single crochet at the corner of the granny square at the dip between the two triangles. (32 sts).
R2: Ch 1, turn. Starting in second st from hook, sc across. (32 sts).
R3-40: Repeat Row 2.
Fasten off. Do not cut the yarn when finished the first side as you can use this to work on the bottom edging later on.
Repeat R1-40 on the other side of the large square to crochet the other side of the backpack (I used a new ball of yarn to crochet the second side). Fasten off, cut the yarn, and leave long end for sewing on this second side.
Once both sides of the backpack have been crocheted and the desired width has been achieved, flip the entire piece inside out. Use yarn tail from the top and whip stitch the edges together from the top to the bottom. Leave the working yarn on the bottom (do not cut) as this can be used when working the bottom edging later on. A tube has been formed. Flip the tube right side out so that the correct side is facing outwards.
Top Edging:
We will be picking up stitches along the top edge of the tube and working in joined rounds. Start at back seam where you whip stitched the side edges together.
Using 3.75 mm hook,
Round 1: Make a slip knot. Insert crochet hook at back seam, add slip knot onto hook, pull through. Chain 2, work 1 hdc in same stitch. Yarn over, insert your hook into an adjacent space, yarn over and pull up a loop. Yarn over and pull through all three loops (a half double crochet has been created). Keep repeating this process to pick up 114 half double crochets around, trying to space them as evenly as possible. When approaching the dip of the “V” of the large square (in the center front of the tube), work 3 extended half double crochets to help even out the height of the round. At the end of the round, slip stitch to the top of the first hdc. (114 hdc)
R2: Chain 2, hdc in same st. Hdc in third loops around. Slip stitch to top of first hdc. (114 hdc)
R3: Chain 2, hdc in same st. Working in third loops, hdc 2, ch 1, skip 1. Working in third loops, *Hdc 3, Ch 1, Sk 1*, rep around until last two stitches. Hdc 2 in last 2 sts. Slip stitch to top of first hdc. (114 sts)
R4: Chain 1, sc in same st. Sc 2 in third loops and bump of chain 1. *Sc 3 in third loops and bump of chain 1*, rep around. Slip stitch to top of first sc. (114 sc)
R5: Chain 1, sc in same st. Sc around. Slip stitch to top of first sc. (114 sts)
R6-8: Repeat R5.
R9: Chain 2, hdc in same st. Hdc 2, ch 1, skip 1. *Hdc 3, Ch 1, Sk 1*, rep around until last two stitches. Hdc 2 in last 2 sts. Slip stitch to top of first hdc. (114 sts). [This is the round through which we will be weaving in the straps later on.]
R10: Repeat R4.
R11-14: Repeat R5.
Switch to 2.75 mm hook,
R15: Chain 1, work reverse single crochet or crab stitch around. (114 sts).
Fasten off.
Bottom Edging: Flip backpack upside down and repeat Rounds 1-8 of Top Edging (you can continue using the yarn you left from the backpack side). DO NOT CUT the working yarn of the bottom edging as we will be using this yarn to slip stitch the bottom edging to the bottom of the backpack.
Bottom of Backpack – Rectangle (make 2):
Using 3.75 mm hook and working in turned rows,
Chain 42.
Row 1: Starting in second chain from hook, sc across. (41 sts)
R2: Chain 1, turn. Starting in second st from hook, sc across. (41 sts)
R3-19: Repeat Row 2.
Seam two rectangles together down center length and along edges using running stitch, leaving front and back loops untouched.
Use stitch markers to attach bottom rectangles to tube. Locate the middle stitch of the tube (use center of the granny square as guide) and attach stitch marker to both the front and back centers of the tube. Attach these stitch markers to the 21st stitch of the rectangle (both top and bottom as this is the exact center of the rectangle). Count 20 stitches away from center stitch marker and attach corners of rectangle to corresponding stitches of the tube (repeat for all 4 corners). Add 2 more stitch markers to attach short edges of rectangles to short edges of backpack.
Using working yarn from bottom edging, begin slip stitching bottom rectangles to bottom edging, matching up stitches along the way. Insert crochet hook through front and back loops of bottom edging and front and back loops of both rectangles, yarn over, and pull through all loops. Continue in this manner around until entire perimeter of rectangle has been attached to the tube.
Strap:
Using 2.75 mm hook and leaving long initial end of 37” (94 cm),
Chain 7.
Row 1: Starting in second chain from hook, sc 6.
We will now begin crocheting in continuous rounds. Make sure the wrong side is facing outwards, so we will be working counter-clockwise. The wrong side or back side of single crochets has horizontal bars (these horizontal bars are not visible on the right or correct side of the stitches). Rather than working in the front or back loops as we typically do, we will be working in these horizontal bars.
Round 2: Single crochet in horizontal bars around. (6 sc)
Repeat Round 2 until strap measures 55.5” (141 cm) or until desired length. Keep in mind that the strap will stretch a bit with wear. I am 5’6 for reference – you may want to adjust your strap length depending on your height. Before finishing off the strap, you can weave it into the holes (as described below) and use stitch markers to attach the ends of the strap to the bottom of the backpack. This will give you a rough idea of how the backpack will hang on you and whether you want to increase or decrease the length of the strap depending on your preference.
Once desired length is achieved, fasten off and leave long 37” (94 cm) end.
***I have filmed this video below to demonstrate how to locate the horizontal bars on the wrong/back side of crochet! Take a look to see this technique in action- keep in mind that the first few rounds will be trickier, but once you get going, it will become easier!
Weaving in Strap:
We will be weaving in the strap through Round 9 of the top edging. In Round 9, there are 28 holes or Chain 1 spaces.
Starting from the center back (where each round begins and ends with slip stitch) and working clockwise, place a stitch marker above the following holes: 3, 13, 17, 27.
When front of backpack is facing you, insert each end of the strap through the 13th and 17th hole. Weave each end through every second hole. Each end will permanently exit the backpack (so ends are facing outwards) at the 3rd and 27th hole.
Using long initial ends, whip stitch each end of the strap to the bottom left and right corners of the backpack securely. Attach them at the point where the bottom rectangles were whip stitched to the bottom edging. For extra security, flip back inside out. Using yarn needle, weave both strap ends through the bottom rectangles so they meet at the center. Tie multiple knots and weave in ends.
Interior Cell Phone Pocket (measuring 5” (12.7 cm) wide, 6” long (15 cm) – adjust as necessary to fit your own cell phone)
Using 3.75 mm hook and working in turned rows,
Chain 22.
Row 1: Starting in second chain from hook, sc across. (21 sts)
R2: Chain 1, turn. Starting in second st from hook, sc across. (21 sts)
R3-35: Repeat Row 2
Fasten off and leave long end for sewing. Use running stitch and attach cell phone pocket to inside of back panel, attaching down one side, along the bottom, and up the other side of the pocket.
Optional tassel:
Cut 25 strands of yarn approximately 16” (41 cm) in length (can wrap around hardcover book to get consistent lengths).
Fold strands in half. Cut 20” (51 cm) strand of yarn and tie top of tassel to form a loop extending from the top (so tassel can be attached to backpack later on) and hide ends with rest of strands.
Wrap various colours of embroidery floss along strands to add pops of color, leaving 0.75”/2 cm at top. We wrapped 3 different colors approximately 0.4”/1 cm in length each. Please reference this very helpful video tutorial HERE to see how to wrap embroidery floss around the tassel and how to hide the ends neatly.
Wrap packing tape around bottom of tassel. Cut along edge of tape to trim edges. Loop tassel through strap.
Final tassel length: 7”/18 cm
***Please check out this VIDEO I filmed below in which I explain how the backpack is constructed and demonstrate how to easily open and close the backpack!
************************
We are delighted with how the Wildrose Backpack turned out! Ryan and I worked hard to figure out the different components, and it is almost like a puzzle as the pieces are put together and you see the backpack take shape!
We were first inspired to crochet a backpack in Disneyland when we were standing behind someone wearing a chic taupe crocheted backpack in the Dumbo ride line-up. Our eyes kept being drawn to the backpack in front of us as we got closer to riding our flying elephant, and we vowed to try and make our own version. It was so much fun putting our own touches on the backpack and figuring out a unique construction as the backpack we saw was simply made of single crochets!
I love how you can try out so many different stitches and techniques in this one design: single crochets, double crochets, half double crochets, clusters, puff stitches, working in the round, and working in turned rows. The classic granny square gets a twist as it is tilted into a diamond with beautiful triangles framing it!
The neutral color means that it will match with everything, and I envision myself wearing this backpack to summer festivals, to the beach, to the park, and to all my summer adventures! I love this practical design that will help me carry my items and allow me to bring a touch of crochet wherever I go! When trying to think of the perfect name for this design, I searched for beautiful floral names since the granny square looks like a blossoming flower. The wild rose is the provincial flower of Alberta (where I was born and raised and currently reside), so I thought the Wildrose Backpack was absolutely perfect!
Since this design is broken down into so many different sections, I thought it would be a very fun crochet-along so that people could tackle the different parts together and spur each other on! If you would like to join the Wildrose Backpack Crochet-Along, please join our Facebook group HERE! You can post your yarn color selections, work-in-progress photos, and let us all know how your backpacks are coming along- I really cannot wait to see them! It would be amazing if we all posted photos of us wearing our handmade backpacks on our travels and summer adventures as well!
I hope you have been inspired to crochet your own Spring/Summer backpack – Ryan and I really enjoyed designing this unique piece, and we hope you will give it a try and bring it along your adventures! If you are looking for a knit backpack, do check out my dear friend Jessica of Mama in a Stitch‘s new “Straw-Like Easy Backpack” knit pattern HERE as it also uses 24/7 Cotton! Once again, you can purchase a convenient kit containing all the yarn you need to crochet your own Wildrose Backpack HERE and a concise PDF of this pattern with all the step-by-step pictures HERE! Thank you for supporting my work, everyone!
{This post is sponsored by Lion Brand Yarn! I’ve loved working with their yarn throughout the years and I’m thrilled that I get to collaborate with them every month!}
This pattern is an original pattern by Stephanie Lau of All About Ami. Please do not claim this pattern as your own. If you wish to share this pattern, you may link to this pattern but please do not reprint it on your site. You may keep a copy for your own personal use but please DO NOT sell the pattern or distribute it.
You may sell products made from this pattern but please clearly credit the design to me, Stephanie Lau of All About Ami, and provide a link to my blog www.AllAboutAmi.com. Permission is NOT granted for mass production or factory manufacturing of any kind. Thank you for being respectful and for your understanding!