***You can purchase an INEXPENSIVE AD-FREE PDF of this pattern on Etsy HERE! This beautifully formatted PDF includes the step-by-step pictures and is a total of 6 pages including the cover page! You can also check out my Chinese New Year Zodiac Amigurumi Bundle HERE as it includes ALL my special zodiac designs to date at a discounted price! PLEASE follow along with my step-by-step blog post HERE to see more detailed photos and read the inspiration behind this amigurumi rat!
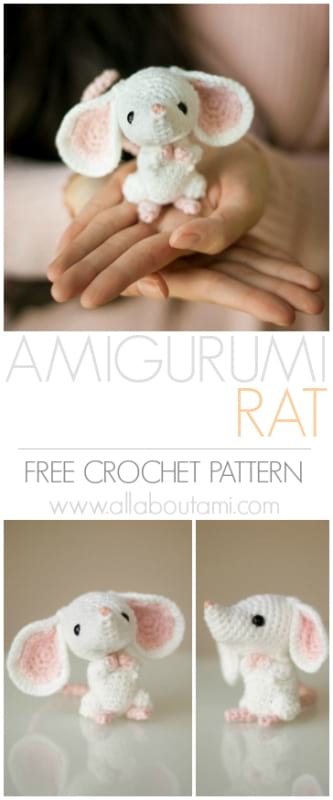
Crochet your own adorable rat complete with protruding snout, floppy ears, flexible tail, and the sweetest pose. You will love creating this little darling for all the rat and mouse lovers in your life and to help celebrate Chinese New Year!
Materials:
- Coboo Yarn (lightweight level 3) in “White” (~22 g) and “Pink” (~5 g)
- 2.75 mm Clover Amour Hook
- Yarn needle (bent tip helpful for attaching amigurumi parts- see HERE)
- Fiberfill
- 7.5 mm safety eyes
- Pink embroidery floss
- Optional: Decorative Floral wire (12 gauge) for tail
Notes:
- Please check out my blog posts entitled “Amigurumi for Beginners“, “How to Read Amigurumi Patterns“, “The Magic Circle“, “The Invisible Decrease“, “How to Crochet Around a Foundation Chain” and “The Right Side of Amigurumi” for helpful tips and techniques that you can use when crocheting this amigurumi.
- Work in continuous rounds so there is no visible seam (do not slip stitch after each round).
- To give the face more definition, we will be using a technique called eye indentation as described in more detail below. This technique pulls the safety eyes back to give them more depth.
- Before you begin crocheting the head, cut two long strands of white yarn (approximately 20″/51 cm each) to use for the eye indentation.
Finished Dimensions: 3″/7.6 cm tall, 2″/5 cm wide (4.5″/11.4 cm from ear to ear)
PATTERN
Before beginning to crochet, cut two long strands of white yarn (at least 20″/51 cm) and set aside for eye indentation.
HEAD
Using white yarn,
R1: 4 sc in Magic Ring. (4 sts)
R2: *Sc 1, Inc*, rep 2 times. (6 sts)
R3: *Sc 2, Inc*, rep 2 times. (8 sts)
R4: *Sc 3, Inc*, rep 2 times. (10 sts)
R5: *Sc 4, Inc*, rep 2 times. (12 sts)
R6: Sc 4, Inc x 4, Sc 4. (16 sts)
R7: Sc 8, Inc x 2 times, Sc 6. (18 sts).
R8: Sc 6. *Inc, Sc 1*, rep 4 times. Sc 4. (22 sts)
R9: Sc 8. *Inc, Sc 1*, rep 4 times. Sc 6. (26 sts)
R10: Sc 14, Inc x 2, Sc 10. (28 sts)
R11: Sc around. (28 sts)
R12: Sc 16, Inc x 2, Sc 10. (30 sts)
R13: Sc around. (30 sts)
R14: Sc 18, Inc x 2, Sc 10. (32 sts)
R15: Sc around. (32 sts)
R16: *Sc 6, Dec*, rep 4 times. (28 sts)
R17: *Sc 5, Dec*, rep 4 times. (24 sts)
R18: *Sc 4, Dec*, rep 4 times. (20 sts)
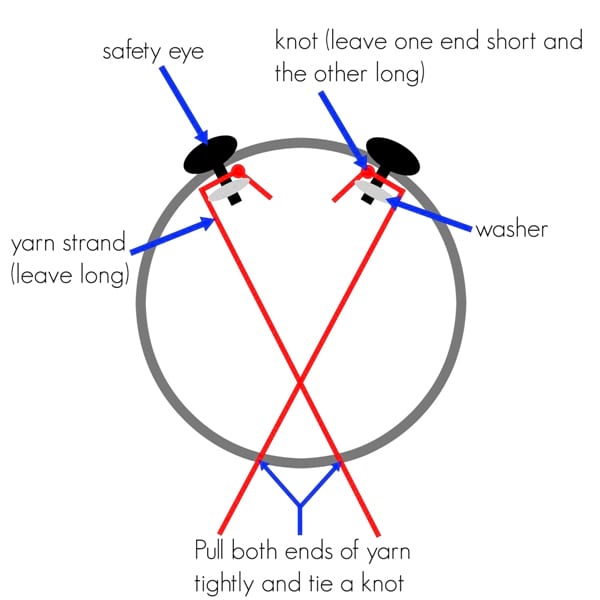
Place 7.5 mm safety eyes between Rounds 9 and 10 (about 11 stitches apart, counting along Round 9). DO NOT snap in washers yet.
To give the face more definition, we will be using a technique called eye indentation. After inserting the safety eyes (without attaching washer yet), use white yarn strands you set aside at the beginning and tie knots around post of each safety eye. Add the washers. Pull each yarn strand downwards (ensure the strands cross each other to form an X inside the head). Using your crochet hook, pick up the strands and have them exit the head between Rounds 9 and 10. Stuff head gently.
[You can reference this picture below taken from the Chinese New Year Pig to illustrate the eye indentation technique.]
R19: *Sc 3, Dec*, rep 4 times. (16 sts)
R20: *Sc 2, Dec*, rep 4 times. (12 sts)
Finish stuffing.
R21: Dec around. (6 sts)
Fasten off and use yarn tail and needle to go through front loops of remaining six stitches. Pull tight to close and weave in end. Pull yarn ends from eye indentation tight, tie knots, and weave in ends.
Adding nose: Using pink embroidery floss and yarn needle, add pink nose onto upper half of magic circle.
Outer Ears (make 2)
Using white yarn,
R1: 6 sc in Magic Ring. (6 sts)
R2: Inc around. (12 sts)
R3: *Sc 1, Inc*, rep 6 times. (18 sts)
R4: *Sc 2, Inc*, rep 6 times. (24 sts)
R5: *Sc 3, Inc*, rep 6 times. (30 sts)
R6: *Sc 4, Inc*, rep 6 times. (36 sts)
R7: Sc around. (36 sts)
Fasten off and leave long end for sewing.
Ear Lining (make 2)
Using pink yarn,
R1: 6 sc in Magic Ring. (6 sts)
R2: Inc around. (12 sts)
R3: *Sc 1, Inc*, rep 6 times. (18 sts)
R4:*Sc 2, Inc*, rep 6 times. (24 sts)
Fasten off and weave in end.
Place pink ear lining onto white outer ear so wrong sides are facing each other (right sides should be the outer sides). Use white yarn to attach pink ear lining to outer ear by picking up stitches behind front and back loops of pink ear lining (leave the front and back loops untouched).
Pinch tips of ears to fold them. Place folded tips onto either side of head across Rounds 14-16, about 7 stitches across (along Round 15) and attach into place.
Body
Using white yarn,
Chain 5 (this is the foundation chain- we will be crocheting around it. See HERE for tutorial).
R1: Starting from second chain from hook, Sc 4 in back loops of foundation chain. Turn and Sc 4 in front loops of the foundation chain (we have created an oval by crocheting around the chain). (8 sts)
R2: Inc, Sc 2, Inc x 2, Sc 2, Inc. (12 sts)
R3: Inc x 2, Sc 4, Inc x 2, Sc 4. (16 sts)
R4: Sc 1, Inc x 2, Sc 5, Inc x 2, Sc 6. (20 sts)
R5: In back loop only, Sc around. (20 sts)
R6-10: Sc around. (20 sts)
R11: *Sc 8, Dec*, rep 2 times. (18 sts)
R12: *Sc 7, Dec*, rep 2 times. (16 sts)
R13: *Sc 6, Dec*, rep 2 times. (14 sts)
Fasten off and leave long end for sewing.
Optional: To help flatten the bottom (so that the rat will sit more easily), pinch the bottom and pull it upwards. Thread original yarn end (that you fastened off with) through yarn needle and insert needle through the inside of the body and through the bottom. Next, move the yarn needle back upwards through another spot along bottom (a couple stitches over) and back through the inside of the body. The bottom is now flat. Add fiberfill stuffing.
Place head on body so that the face is looking upwards (body is attached to Rounds 15-18 of head). Whip stitch into place.
Arms (make 2)
Using pink yarn,
R1: 4 sc in Magic Ring. Switch to white yarn and slip stitch to next stitch (to close up the ring).
Using white yarn,
R2-5: Sc around. (4 sts)
Fasten off and leave long end for sewing. Do not stuff.
Attach each arm onto sides of body, with base of arm on Rounds 10-11. Fold the arms inwards along the chest and upwards towards rat’s head so that two pink tips touch.
Legs/Thighs (make 2)
Using white yarn,
Chain 4 (this is the foundation chain- we will be crocheting around it. See HERE for tutorial).
R1: Starting from second chain from hook, Sc 3 in back loops of foundation chain. Turn and Sc 3 in front loops of the foundation chain (we have created an oval by crocheting around the chain). (6 sts)
R2: Inc, Sc 1, Inc x 2, Sc 1, Inc. (10 sts)
R3: Sc 10. (10 sts)
Fasten off and leave long end for sewing. Do not stuff.
Place each leg on side of body (along Rounds 5-7 of body, approximately 6 stitches apart of Round 6). Whip stitch into place.
Feet (make 2)
Using pink yarn,
R1: 4 sc in Magic Ring.
R2-4: Sc 4. (4 sts)
Fasten off and leave long end for sewing. Do not stuff.
Place feet on bottom of body (around Rounds 3-4 of body) and near the legs. Whip stitch into place.
Tail
Using pink yarn,
R1: 3 sc in Magic Ring.
R2-21: Sc 3. (3 sts).
Optional: Cut wire to more than length of tail. Bend both ends of the wire and wrap tape around the ends so that there are no pointy tips. Place into tail and insert protruding end into bottom back of body. Use pink yarn tail to sew into place and weave in end. Note that if this toy is for a small child, omit the wiring.
************************************
How adorable is this little rat with his sitting position and cute arms? He looks like he is ready to give a red pocket or perhaps say a prayer for a loved one!
He is so sweet looking upwards longingly and is ready to befriend you!
I love how the tail is poseable since it has wiring in it!
If you love this rat, don’t forget to check out our entire zodiac collection so far: Dog, Monkey, Lamb, Pony, Dragon, Chinese New Year Doll, Pig, Rooster and Snake! All of these patterns can be found in my Chinese New Year Zodiac Amigurumi Bundle HERE that contains all 10 patterns (53 pages) at a discounted price! You can also check out the All About Ami Amigurumi Pattern Bundle HERE that contains ALL the amigurumi patterns we’ve designed so far (29 patterns, 147 pages). Subscribe to my e-mail newsletter HERE to keep up to date with all my newest crochet and knit designs!
We only have the ox, tiger, and rabbit left to design! Thank you for following along as we love this tradition of designing the zodiac animal every year. Enjoy crocheting your own amigurumi rats and bringing them to life with your own special touches!
This pattern is an original pattern by Stephanie Lau of All About Ami. Please do not claim this pattern as your own. If you wish to share this pattern, you may link to this pattern but please do not reprint it on your site. You may keep a copy for your own personal use but please DO NOT sell the pattern or distribute it.
You may sell products made from this pattern but please clearly credit the design to me, Stephanie Lau of All About Ami, and provide a link to my blog www.AllAboutAmi.com. Permission is NOT granted for mass production or factory manufacturing of any kind. Thank you for being respectful and for your understanding!