***You can purchase an INEXPENSIVE AD-FREE PDF of this pattern on Etsy HERE and on LoveCrochet HERE! This beautifully formatted PDF includes the step-by-step pictures and ALL 3 PATTERNS to make the Square, Rectangular and Circular Carry-All Trays (total of 9 pages including the cover pages)! Lion Brand Yarn has made a convenient kit HERE that includes the patterns and all the Rewind yarn needed to make a set of trays (kit contains 3 skeins of Rewind yarn so you can make 2 Square Carry-All Trays, 1 Rectangular Tray, and 1 Circular Tray).
***Note that this is the free pattern for the SQUARE CARRY-ALL TRAY!
- The free patterns for the Rectangular Carry-All Tray can be found HERE!
- The free pattern for the Circular Carry-All Trays can be found HERE!
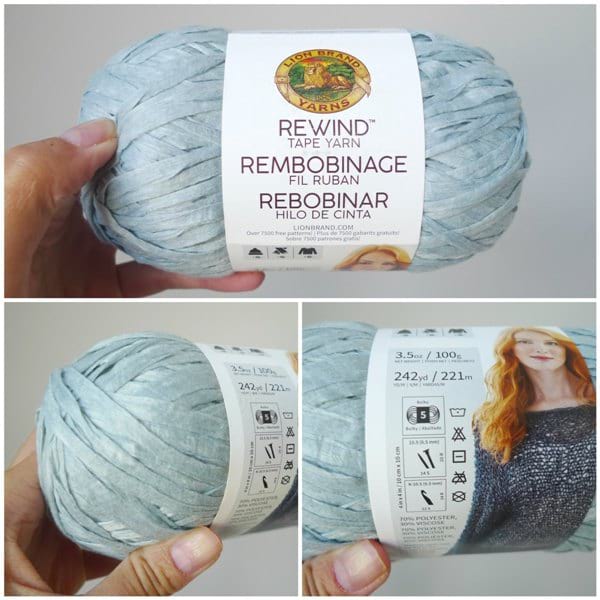
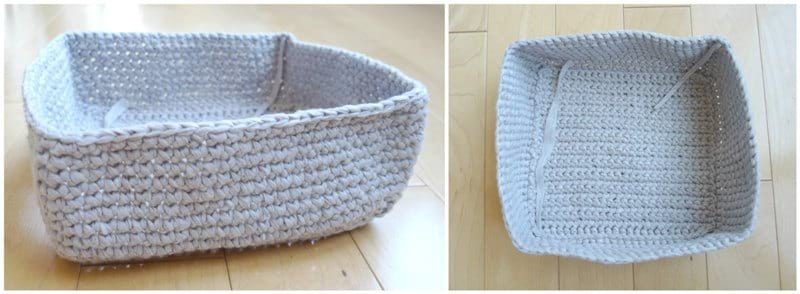
When Lion Brand Yarn first released Rewind Tape Yarn, I was very intrigued. This bulky level 5 yarn made of 70% polyester and 30% viscose feels unlike any yarn I have worked with before. It is difficult to describe, but it sort of feels like an old memory book I used to have- that is, it feels like a soft paper! I knew I wanted to try and crochet some handy carry-all trays with this special yarn as I had always wanted to try designing some. I wanted to try making trays of various sizes and shapes, and I tried to maximize each skein as much as possible! I started off with the Square Carry-All Tray!
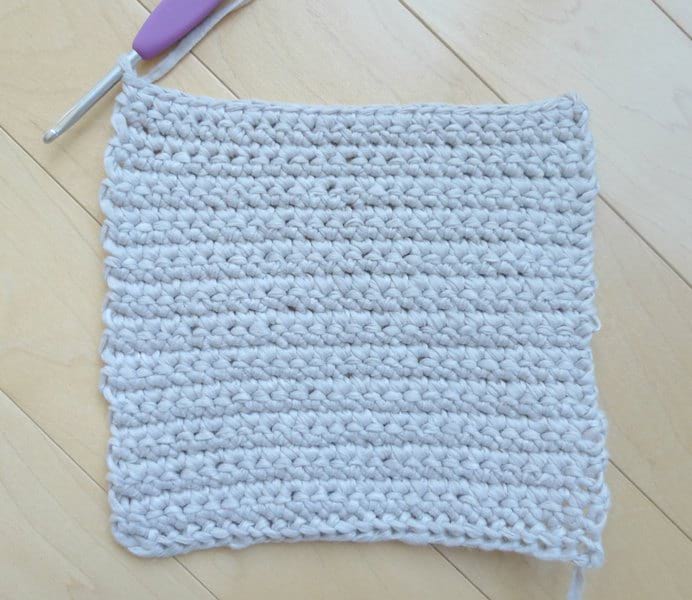
To begin, crochet the square base by working in turned rows with your 4 mm crochet hook.
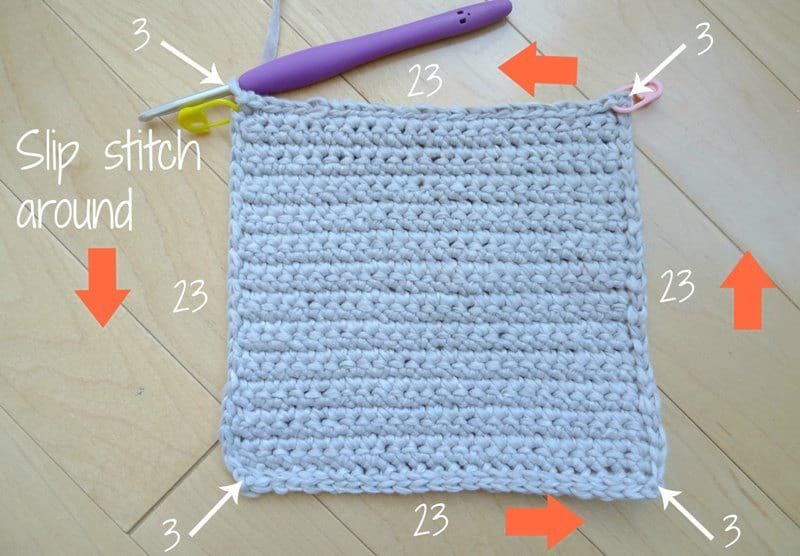
Next, pick up stitches along the perimeter of the square by working slip stitches all around. Work 3 slip stitches in each corner to help round it off.
It is time to crochet the body or height of the carry-all tray working in continuous rounds. To help create an edging to differentiate the base from the body of the tray, work the first round of single crochets in the back loops only. The back loops are the loops further away from you.
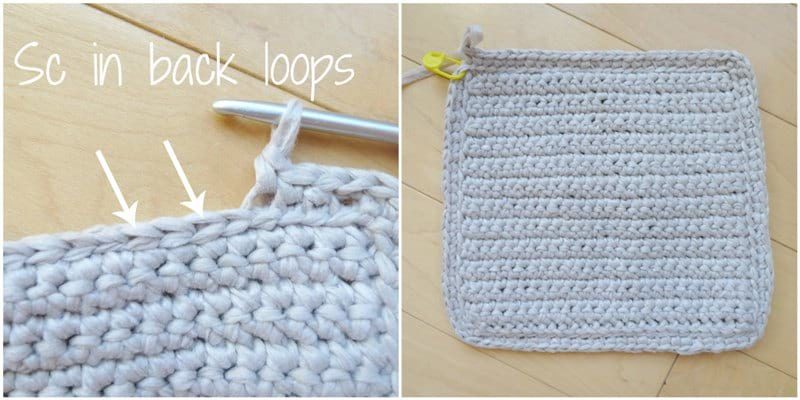
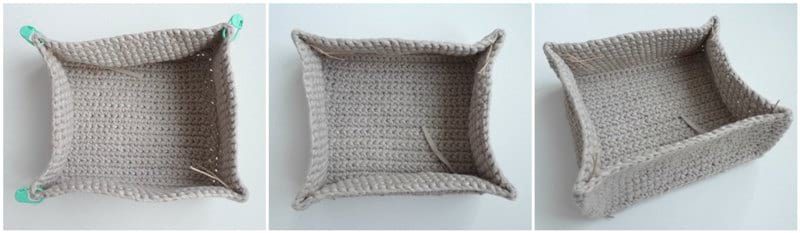
After crocheting the height in continuous rounds, you have created a square tray!
It is now time to pinch the corners to give a more defined look and also provide more closure towards the top. Pinch each corner and insert your lock ring stitch marker to help hold the shape.
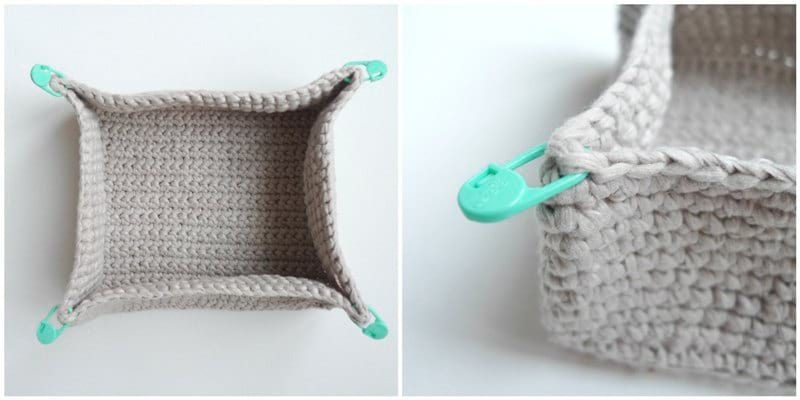
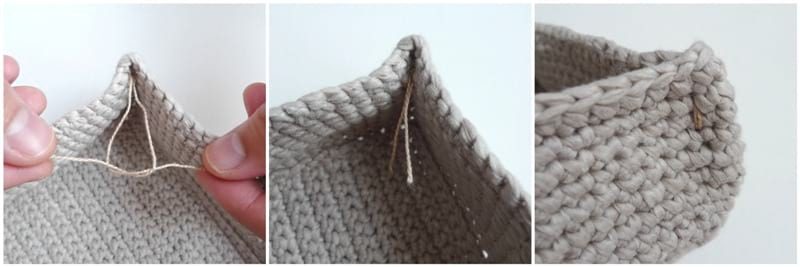
Thread your Rewind yarn or embroidery floss through a yarn needle and insert the needle from inside the tray to the outside approximately two stitches away from the corner and below the last round of stitches. Insert the needle directly two rounds down (below third last round of stitches) and across to the other pinched side (below third last round of stitches and approximately two stitches from corner). Insert the needle directly up two rounds and then through to the other pinched side where you first began. Keep repeating this approximately two to three times to lock the pinched side into place with a clean horizontal line.
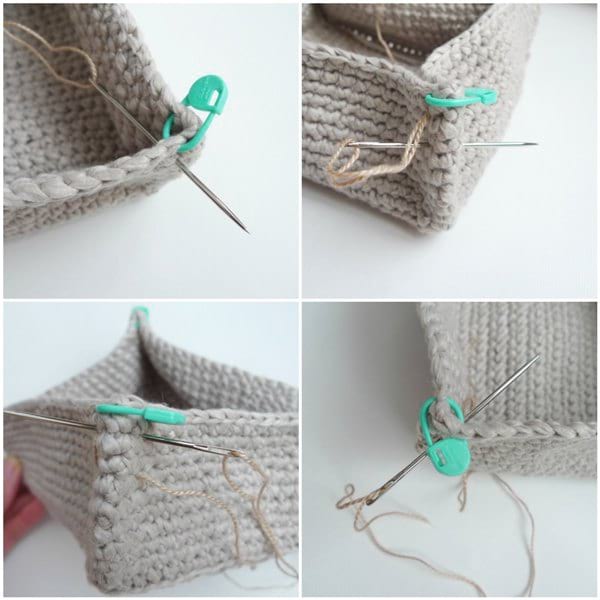
End off with the yarn/embroidery floss on the inside of the tray. Cut off the end and tie multiple knots with the initial end- then hide the ends.
Repeat this process across all four corners. As a finishing touch, you can sew your garment tag onto the edge of the Carry-All Tray. I got my cork tags from Diane of Brickbubble– I love having my logo on these custom fold-over tags!
*********************************
Here is the free pattern for the Square Carry-All Tray:
Materials:
- 1 skein of Rewind Yarn (level 5 bulky tape yarn) by Lion Brand Yarn – I used the colorway “Greige”; each square carry-all tray requires 40 grams of yarn, so you will be able to make two square trays with 1 skein.
- 4 mm Clover Amour crochet hook
- Yarn Needle (bent tip helpful for attaching)
- Lock ring stitch markers
- Embroidery floss (to pinch corners)
- Cork garment tag by Brickbubble (optional)
Gauge: 18 sc and 20 rows = 4″/10 cm
Dimensions: Base: 5.75″/14.6 cm x 5″/12.7 cm, Height: 2″/5 cm
Notes:
- The base of the square tray is worked in turned rows.
- Stitches are then picked up along the perimeter of the flat square.
- The height of the tray is worked in continuous rounds.
- The corners are pinched to create some shaping and closure for the tray.
Abbreviations:
- Invisible Decrease (inv dec): Insert hook into front loops only of next 2 stitches, yarn over, pull through 2 loops on hook, yarn over, pull through final 2 loops on hook (counts as 1 single crochet).
- Foundation Single Crochet: Step 1: Make a slip knot, chain 2. Step 2: Insert hook into the V of the first stitch. Step 3: Yarn over and pull through stitch. Step 4: Yarn over and pull through one loop. Step 5: Yarn over and pull through both loops.Keep repeating steps 2 – 5 for desired number of stitches.
- See video tutorial HERE.
PATTERN:
We will be working in turned rows for the base.
Row 1: Foundation single crochet 25. (25 sts) [Alternatively, you can Chain 26 and then starting in second chain from hook, sc across to get 25 sts].
Row 2: Chain 1, turn. Starting in second chain from hook, sc across. (25 sts)
Row 3-25: Repeat Row 2.
You have completed a flat square. We will now begin working in continuous rounds and build up the height. Work slip stitches around the perimeter of the square, working 3 slip stitches in each corner for a total of 104 slip stitches. To pick up slip stitches, insert hook into space, yarn over and pull through both loops. Keep repeating across.
Round 1: Slip stitch 1 in first corner, slip stitch 23 across first side, 3 slip stitch in second corner, slip stitch 23 across second side, 3 slip stitch in third corner, slip stitch 23 across third side, 3 slip stitch in fourth corner, slip stitch 23 across fourth side, 2 slip stitch in first corner (where you started beginning of round). (104 sts)
Round 2: In Back loops only, single crochet around. (104 sts)
Round 3: Inv dec, sc 23, inv dec, sc 24, inv dec, sc 24, inv dec, sc 25. (100 sts)
Round 4: Single crochet around. (100 sts)
Round 5-11: Repeat Round 4.
Slip stitch to next stitch and fasten off. Weave in ends.
We will now pinch the corners to give the carry-all tray more shaping and closure towards the top.
Locate four corners of carry-all tray. Pinch each corner and attach lock ring stitch marker to help hold the shape. Thread same yarn or embroidery floss through yarn needle and insert needle from inside tray to the outside approximately two stitches away from corner and below last round of stitches. Insert needle directly two rounds down (below third last round of stitches) and across to the other pinched side (below third last round of stitches and approximately two stitches from corner). Insert needle directly up two rounds and then through to the other pinched side where you first began. Keep repeating this approximately two to three times to lock pinched side into place with clean horizontal line. End off with yarn/embroidery floss on the inside of the tray- cut off end and tie multiple knots with initial end. Hide ends. Repeat this process across all four corners.
Optional: Sew fold-over garment tag onto edge of tray.
***********************
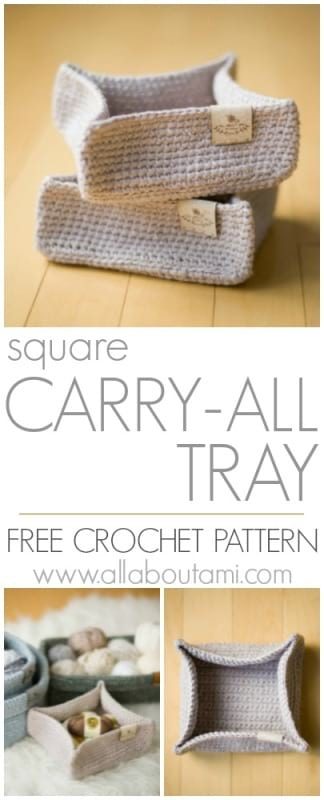
This Square Carry-All Tray has such a beautiful shape and adds a modern touch to your home decor!
With 1 skein of Rewind yarn, you can make two Square Carry-All Trays! Rewind yarn is perfect for this project since it does not fuzz up, has beautiful stitch definition, and has a lovely matte and modern look to it. These trays are perfect for gifts as they are quick to crochet and are so handy to have around the home. They would make practical Christmas gifts, Mother’s day gifts, or year-end Teacher’s gifts! I think I will be making more for Myla and Brielle’s teachers!
As soon as I come home, the first thing I do is remove my watch and jewelry and tie my hair back. Before, I would leave my jewelry on the kitchen counter, but I would always worry that they would somehow get lost under other items or end up on the floor. I now put all my small items in this Square Carry-All Tray as I keep it on my kitchen counter! I love having this tray to keep everything safe and organized. These trays could also be handy for storing notions on your workspace, paperclips, post-it notes, nail polish, small toys (do your children collect little Shopkins and Kinder Surprise toys too?)…the sky is the limit!
Lion Brand Yarn has put together a convenient kit so that you can make a set of Carry-All Trays for yourself and for gifting! Each kit contains 3 skeins of Rewind yarn in my favorite colors (Greige, Olive You, and Marble) so that you can make 2 Square Carry-All Trays, 1 Rectangular Tray, and 1 Circular Tray. Purchase the KIT HERE, and be sure to take advantage of their current sitewide sale (at least 30% OFF)! You can keep some for yourself or gift them to the special people in your life! Everyone can use these cute and practical trays around the home and at the office!
I hope you enjoy using these Carry-All Trays to help you stay organized and to add a touch of crochet to your spaces! They would also fit in drawers or on your bathroom counter to keep towels, nail polish, or toiletries organized. As you can see in the picture below, I am always looking for more yarn storage ideas! The free pattern for the Rectangular Carry-All Tray can be found HERE, and the free pattern for the Circular Carry-All Trays can be found HERE! If you would like a concise, ad-free version of all the patterns containing all the step-by-step photos, check out the PDF HERE! Subscribe to my e-mail newsletter HERE so you’ll know when these new designs get released on my blog! Thanks for your support, and happy crocheting and organizing!
{This post is sponsored by Lion Brand Yarn! I’ve loved working with their yarn throughout the years and I’m thrilled that I get to collaborate with them every month!}
This pattern is an original pattern by Stephanie Lau of All About Ami. Please do not claim this pattern as your own. If you wish to share this pattern, you may link to this pattern but please do not reprint it on your site. You may keep a copy for your own personal use but please DO NOT sell the pattern or distribute it.
You may sell products made from this pattern but please clearly credit the design to me, Stephanie Lau of All About Ami, and provide a link to my blog www.AllAboutAmi.com. Permission is NOT granted for mass production or factory manufacturing of any kind. Thank you for being respectful and for your understanding!