***You can purchase an INEXPENSIVE AD-FREE PDF of this pattern on Etsy HERE! This beautifully formatted PDF includes ALL the step-by-step pictures and pattern and is a total of 5 pages including the cover page! This pattern is also part of two bundles: the “Fuzzy Fleece Crochet PATTERN BUNDLE” (contains ALL of the patterns that I have designed with this special fleece sherpa yarn) and the “Crochet Bags PATTERN BUNDLE” (contains ALL of my bag designs). These bundles are a great way to purchase multiple patterns at a discounted price! Lion Brand Yarn has also made a convenient kit HERE that includes the pattern and all the Go For Fleece Sherpa yarn needed to make this stylish bag!
Pattern Description:
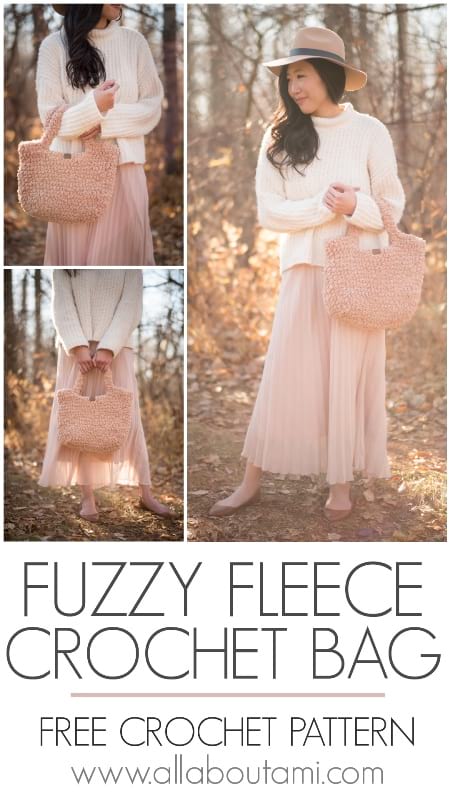
Crochet this stylish bag using soft and textured fleece sherpa yarn! This bag works up quickly and is the perfect accessory for your fall and winter outfits!
Materials:
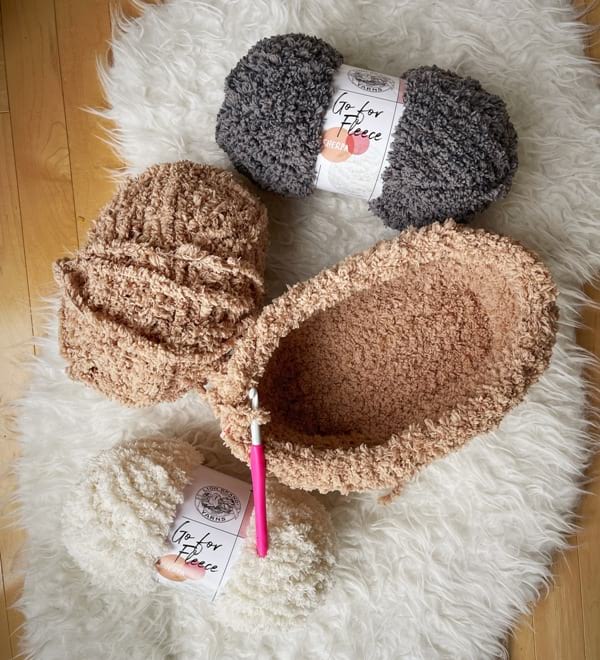
- Go For Fleece Sherpa yarn (Level 7 Jumbo) in “Honey”: 330 grams/160 yds (2 skeins); purchase the convenient Lion Brand Yarn kit HERE!
- 8 mm Clover Amour hook
- Yarn needle
- 5 lock ring stitch markers
- Medium size Periea bag organizer (optional)
- Faux leather garment tag (optional – I have mine custom made by Brickbubble HERE)
Gauge: 8 stitches and 7 rows = 4 inches in single crochet
Finished Dimensions: 14”/36 cm across, 10.5”/27 cm tall (not including handles)
Abbreviations:
- Inc (increase) = Work 2 sc in the next stitch. [1 stitch becomes 2 stitches.]
Pattern Notes:
- The rectangular base of the bag is crocheted in turned rows.
- Stitches are picked up along the edges of the rectangle to begin the body of the bag. The body of the bag is worked in joined rounds to build up the height of the bag.
- When working in the round, there is technically a “wrong” and “right” side of crochet (see post HERE). For this bag, we want the “wrong” side to be facing outwards as it is more fluffy. Ensure that you are working in a counter-clockwise direction (this is how the instructions and diagrams are labeled). If you prefer the other side, you can flip the bag inside-out at the very end, or still follow the instructions while working in a clockwise direction (go in the opposite directions of the diagrams).
- You will always place your stitch marker in the chain 1 to mark the beginning of the round. The chain 1 does not count as a stitch. To close up each round, you will slip stitch to the top of the chain 1. Thus, a round of the body would look like this: {Chain 1, Place marker in Chain 1. Single crochet 60 around. Slip stitch to Chain 1 (where the stitch marker is located).} Then you would repeat this for the subsequent rounds.
- Once the desired height has been achieved, 4 stitch markers are placed to help determine the position of the two handles. The two handles are centered along both long sides of the bags. Specific stitch numbers are not given in case the count has been lost or we have varying start points.
- The length of the handles can be altered by crocheting more chain stitches (longer handle) or fewer chain stitches (shorter handle).
- This bag has been designed so that the medium size Periea bag organizer fits perfectly inside! This organizer instantly adds zipper closure and many compartments.
- If you would like to substitute “Go For Faux” yarn (super bulky level 6), one of my pattern testers Jenn Smith wrote up some notes for us: Using a 9 mm hook, you will use about 142 yds/7.6 oz/218 g of yarn (just over 2 skeins). Her finished dimensions were a little smaller following the pattern exactly: 13.5″/34 cm across and 9″/23 cm in height (not including handles). Thank you for your notes, Jenn!
Fluffy Yarn Tips:
It can be challenging working with fluffy yarn if you have never worked with this special type of yarn before. Here are some tips when working with fluffy yarn:
(1) You will need to feel for the next stitch and insert your hook into the next gap as you will not be able to see your stitches or where the next space is. Since you cannot see the stitches, this also means that fluffy yarn is more forgiving as you cannot easily see mistakes.
(2) You will rely heavily on using a stitch marker to mark the beginning of each round (the chain 1). This helps you keep your place in case you need to put down your work or if you get interrupted. You can use the stitch marker as a guide, and if you do not reach the desired number of stitches by the time you reach the stitch marker, you can frog the stitches back to the beginning of the round and try again. [You can also place stitch markers at various points throughout the round to help you keep track, e.g. every 10 or 15 stitches or at the halfway point. Some of my pattern testers did this and found it helpful. Be sure to use a different color for the initial stitch marker to differentiate it!]
(3) Record your number of rounds using a pencil and paper or on your phone. It is very challenging to try and count your rounds when looking at the piece, so it can be very easy to lose your place (compared to projects using regular yarn where you can easily count how many rounds you have completed and where you are in a pattern).
PATTERN
Rectangular Base
Chain 21.
Row 1: Starting in second chain from hook, sc 20. (20 sts)
R2: Chain 1, turn. Starting in second st from hook, sc 20. (20 sts)
R3-7: Repeat Row 2.
The rectangular base is now complete. Do not cut the yarn as we will continue crocheting the body of the bag. My base measured 9.75”/25 cm in length and 4”/10 cm across.
Body:
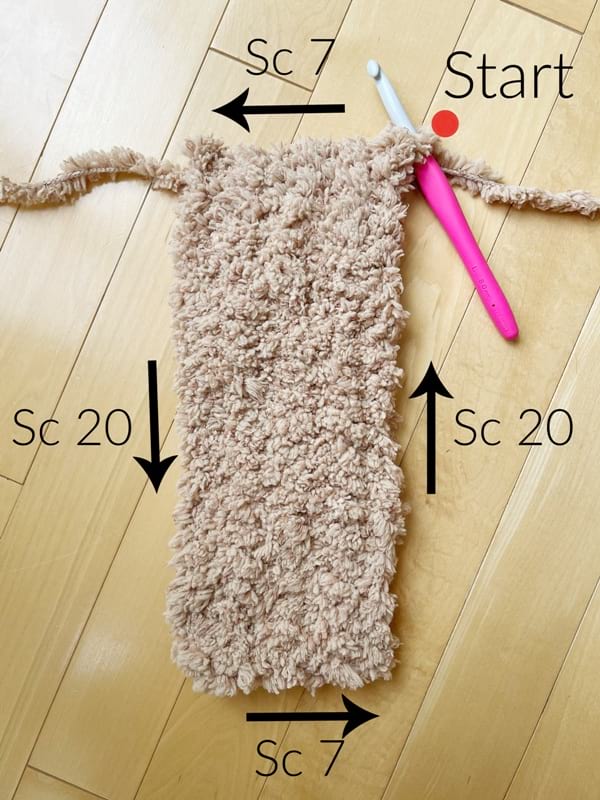
We will now crochet around the perimeter of the rectangular base. Note that we are working in a counter-clockwise direction as shown in the diagram.
Round 1: Chain 1 (place marker), sc 7 across one side, sc 20 across second side, sc 7 across third side, and sc 20 across last side. Slip stitch to chain 1/marker. (54 sts)
R2: Chain 1 (place marker), sc 54, sl st to ch 1/marker. (54 sts)
R3: Repeat Round 2.
R4: Chain 1 (place marker). *Sc 8, Inc*, rep 6 times. Sl st to ch 1/marker. (60 sts)
R5: Chain 1 (place marker). Sc 60, sl st to ch 1/marker. (60 sts)
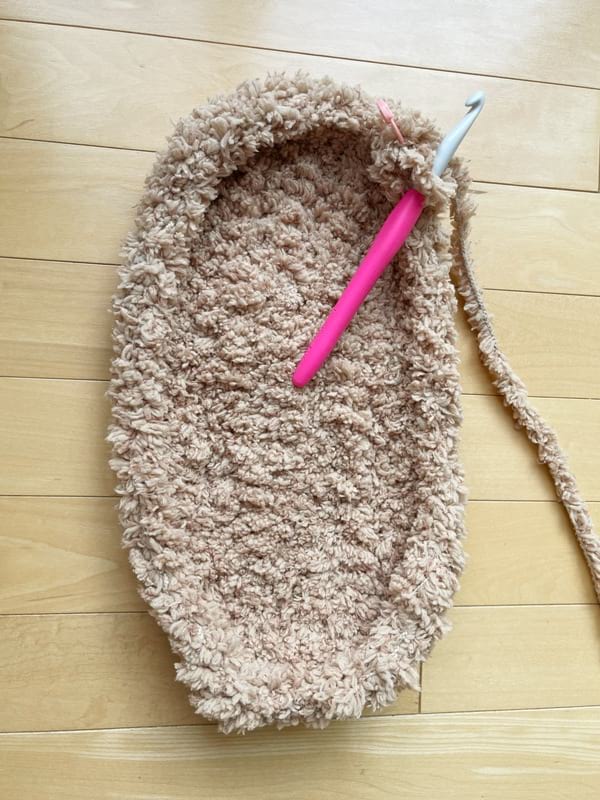
R6-16: Repeat Round 5.
The desired height has been achieved (about 8.5”/22 cm). You can continue adding more rounds to increase the height if desired. Now, it is time to crochet the handles.
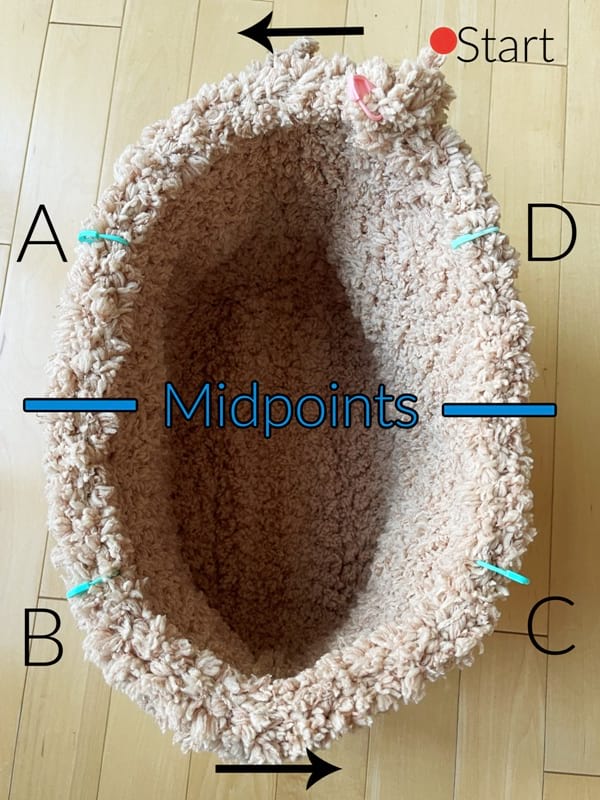
We will be placing four stitch markers to help determine the location of the two handles. Find the midpoint of each long side. For example, if one side measures 14”/36 cm, the midpoint would be at the 7”/18 cm mark.
Place two stitch markers on either side of the midpoints, about 6”/15 cm apart as shown in the diagram below (A and B are 6”/15 cm apart with the midpoint in the middle. C and D are 6”/15 cm apart with the other midpoint in the middle). For reference, I had about 12 stitches between stitch markers A & B (and 12 stitches between stitch markers C & D).
R17: Chain 1 (place marker). Single crochet to A, Chain 25, skip sts between A & B, and sc to B (one handle has been created). Single crochet to C, chain 25, skip sts between C & D, and sc to D (second handle has been created). Continue working single crochets until end of round. Sl st to ch 1/marker. (My handles measured 13”/33 cm in length. You can add more chains to make a longer handle or decrease chains to make a shorter handle.)
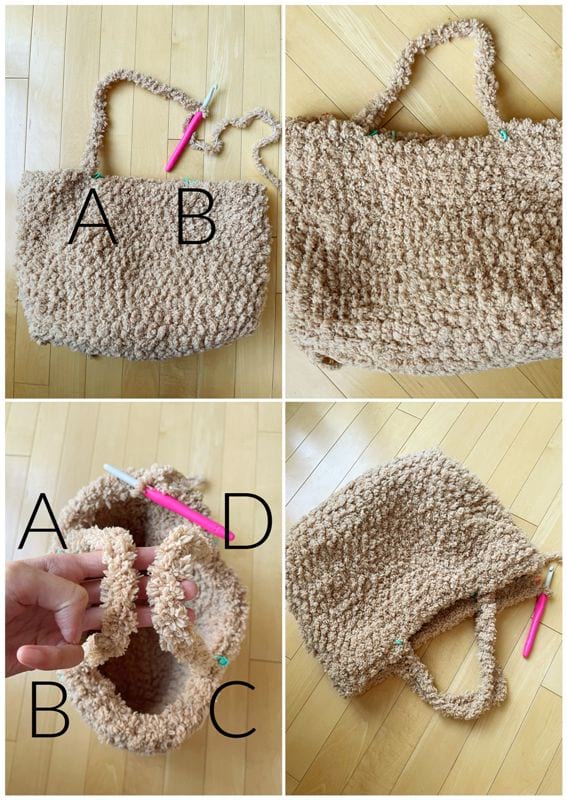
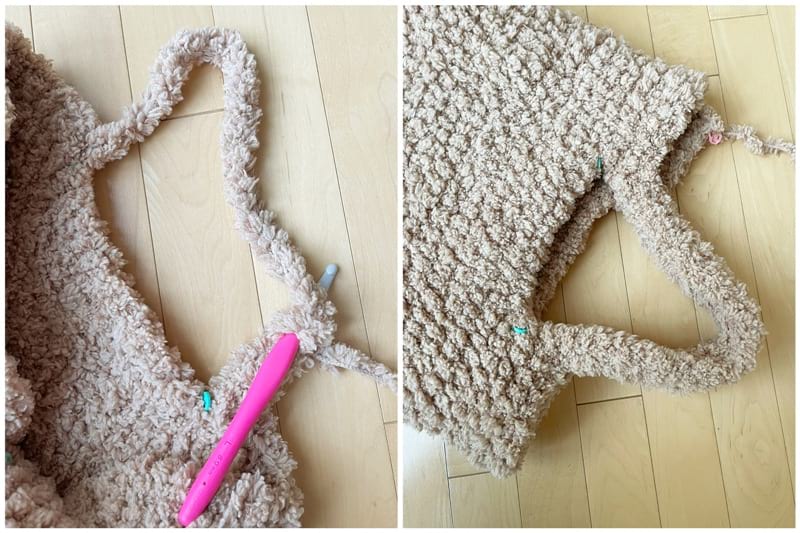
R18: Chain 1 (place marker). Single crochet in each st around, working one single crochet in each chain of the handle (i.e. single crochet 25 for each handle). Sl st to ch 1/marker.
R19: Chain 1 (place marker). Single crochet in each st around. Sl st to ch 1/marker.
Fasten off and weave in ends.
Optional: Place medium size Periea bag organizer inside to instantly add zipper closure and compartments! You can also sew a garment tag onto the bag!

************************************
When I saw cozy fleece and sherpa bags trending, I knew I wanted to design a crochet version! I have really enjoyed working with fluffy yarn throughout the years, and I love the overall texture it provides to finished pieces!
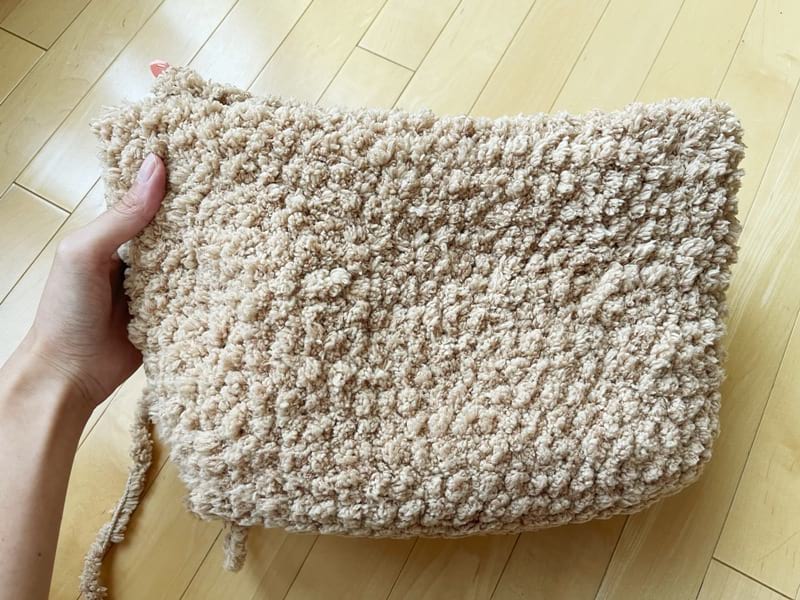
The Fuzzy Fleece Bag is such a cute and stylish way to carry your items! With the bag organizer inside, you can instantly add zipper closure and compartments and easily keep your items organized.
The texture of this bag is unparalleled! Have you ever seen such a soft and cozy bag before? You can cuddle it for warmth and coziness whenever you want hehe!
We took these photos just days before our first snowfall! The landscape looks completely different now as we are completely blanketed in snow. This is the first time that I have designed a fall/winter bag as all my previous bag designs are for Spring/Summer and use much thinner yarns. I am happy I can carry around a handmade bag during the colder months too now (especially since we experience cold weather during most of the year here in Canada)!
I love the color palette of this outfit as it is indicative of what colors I frequently wear and gravitate towards: soft pink, cream and tan/beige/gold. Those are my blog colors as well haha! Years ago when we were traveling in Japan during the wintertime, we frequented many boutiques and I took photos of the cute outfits that I saw on the mannequins. I loved the combination of sweaters with flowy and romantic skirts, and I thought this would be a cute way to showcase this fleece bag!
I hope you enjoy crocheting this Fuzzy Fleece Bag! It is quick to work up and it is very satisfying being able to finish an entire project in a couple sittings. They would make wonderful gifts, and there are so many lovely colors to choose from. You can even gift a bag organizer inside so that the bag is ready to be filled and used once gifted! You can use the hashtag #fuzzyfleecebag on social media so you can see others’ projects and show off your bags too! Thank you for reading, and enjoy this crochet pattern!
{This post is sponsored by Lion Brand Yarn! I’ve loved working with their yarn throughout the years and I’m thrilled that I get to collaborate with them every month!}
This pattern is an original pattern by Stephanie Lau of All About Ami. Please do not claim this pattern as your own. If you wish to share this pattern, you may link to this pattern but please do not reprint it on your site. You may keep a copy for your own personal use but please DO NOT sell the pattern or distribute it.
You may sell products made from this pattern but please clearly credit the design to me, Stephanie Lau of All About Ami, and provide a link to my blog www.AllAboutAmi.com. Permission is NOT granted for mass production or factory manufacturing of any kind. Thank you for being respectful and for your understanding!