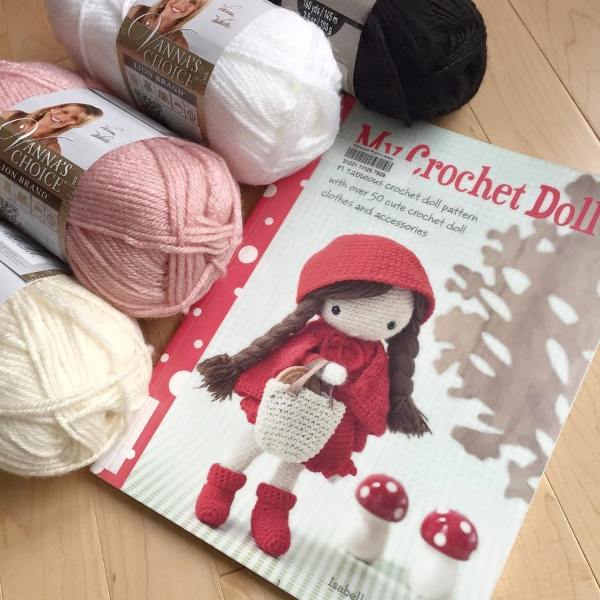
After seeing the gorgeous handmade dolls by mother-daughter duo Rosemary and Erinna of Bubbles & Bongo (see my Craft Chat with them HERE), I was inspired to crochet my own doll. Prior to this, I had mostly crocheted animals, although my very first amigurumi original design was the Chinese New Year Doll. I was interested in crocheting a larger doll using a popular book called “My Crochet Doll” by Parisian artist Isabelle Kessedjian. Ryan and I wanted to crochet a special doll for Myla as a gift to her when she started preschool two years ago, and we will show you what we made! We wanted to make her a unique “Myla Doll” that looked like her and wore her favourite pajamas at that time! I borrowed this book from the library but ended up purchasing it on Amazon HERE later on. I used my 3.25 mm Clover Amour hook with Lion Brand Yarn’s Vanna’s Choice in Fisherman, Pink and White, and a special (now discontinued) Loops & Threads Mirage yarn for the hair!
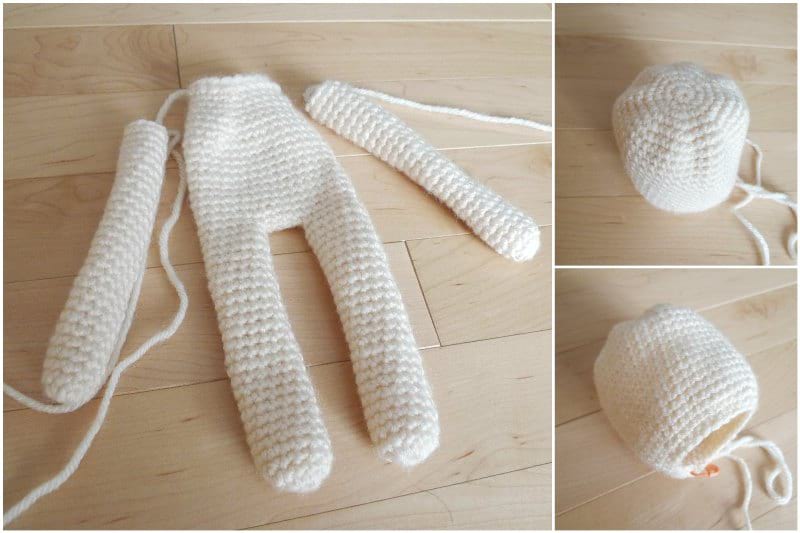
Rosemary and Erinna provided me with a lot of advice as I embarked on crocheting this doll. I also received many tips through social media as people shared their own experiences making their dolls using this book. People generally agreed that the pattern was very cute and simple to follow, although the instructions to add hair was a bit lacking. Some people commented that they found the hair and head too heavy and it was difficult to change the dolls’ outfits as the clothes were very snug. Rosemary and Erinna recommended: working the head top-down instead of bottom-up as stated in the book (a separate scalp colour is worked at the top of the head in the book, but I just kept it the same colour); stopping the torso a bit earlier to shorten the neck (thereby providing more support for the head); and carrying an extra strand of yarn through the last round of the neck to provide more support. Below you can see the various parts of the doll’s body, and how I worked the head top-down.
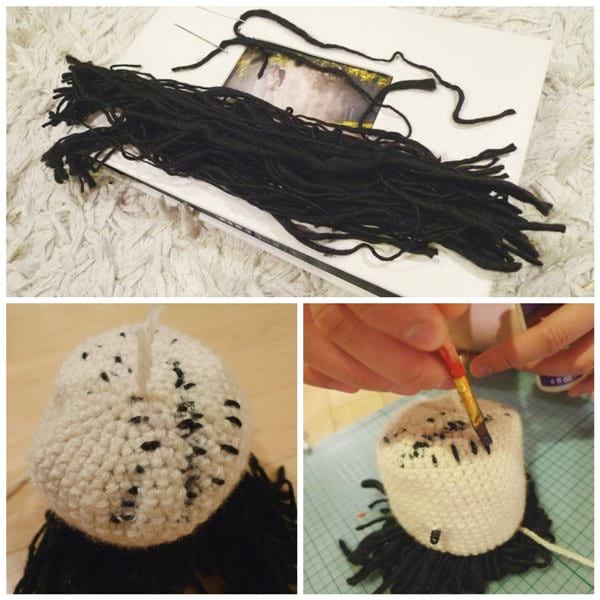
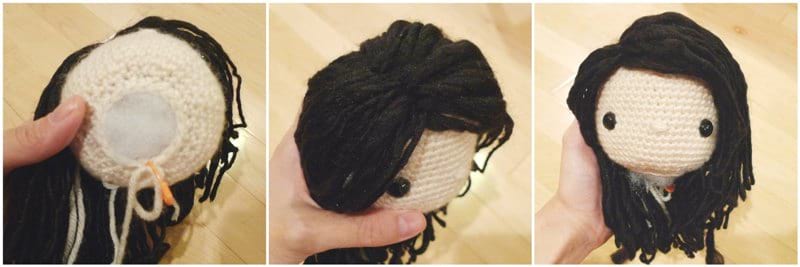
Erinna and Rosemary also provided me with very helpful advice in placing the doll’s hair as I will try and describe (I didn’t take very detailed photos of this process, I apologize)! I used this gorgeous thick and thin yarn that gives the hair such beautiful dimension and more complexity. We measured strands of yarn that were double the length that we wanted the hair to be. We then strategically placed each strand of hair ontop of the head so that both ends were sticking out on the correct side, forming a natural hair part. Below you will see pictures of the wrong side of the head (the inside of the head), and those little black spots are where the strands of hair are entering and exiting the top of the head. To keep the strands in place, Erinna and Rosemary recommended using fabric glue. This method allows more control of where you place each strand of hair. To read about different methods of attaching doll’s hair, check out this tutorial HERE by Kali of The Friendly Red Fox! In the future, I will do a separate tutorial on how we add doll’s hair as I have actually designed my own doll that I will share later on!
Once the glue was done drying, we stuffed the head and closed it up. I love the simple doll face with the large eyes and cute nose that Isabelle has created. Myla asked where her mouth was as soon as we gave it to her though haha!
To allow our Myla doll to be poseable, we inserted some wiring in the legs and torso (just like our Chinese New Year Monkey HERE). The wiring helps the Myla doll to kick her legs and sit down! If you’re making your doll for a baby or very small child, I would omit the wire or any hard items (e.g. safety eyes) that could potentially be a choking hazard or hurt the child. Ryan folded the sharp ends of the wire in on itself and secured them with electrical tape to prevent the sharp edges from poking through!
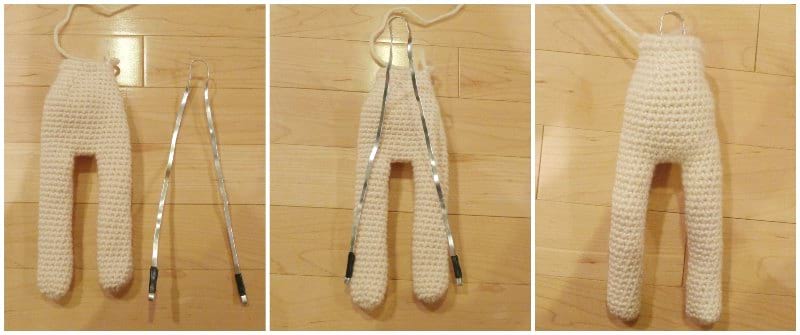
I followed the pants pattern and made it striped to match Myla’s pajamas!
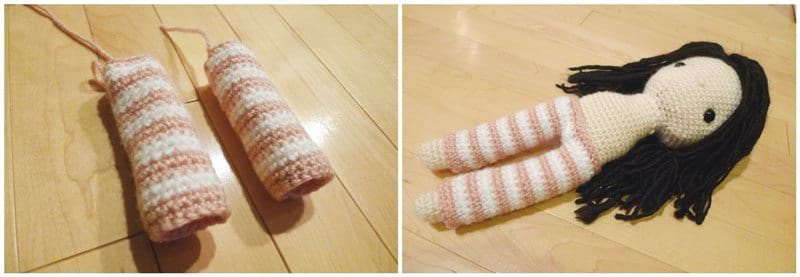
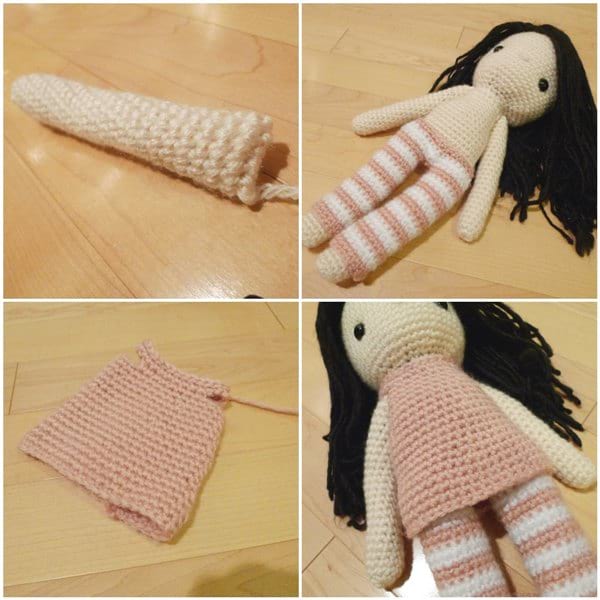
Then, we sewed on the arms and I crocheted the torso portion of her shirt (I adjusted the pattern with my own numbers slightly). We slipped it on her and then crocheted the sleeves around the arms. We knew that the Myla doll would remain in this outfit and that we would not try and interchange her clothes as they fit very snugly.
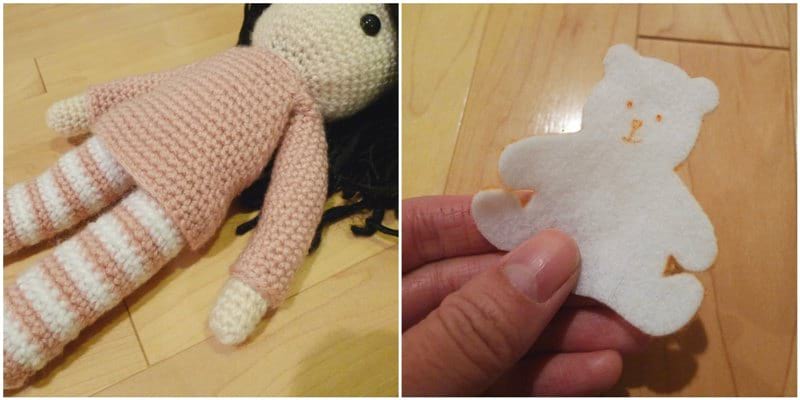
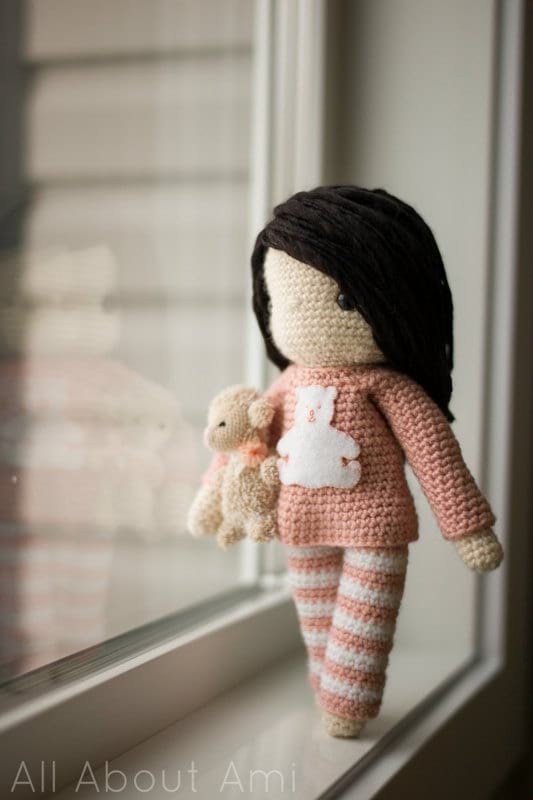
Ryan cut out this adorable little bear from felt to match the white teddy bear on Myla’s shirt! He used pink thread and sewed around the border of the bear (to match the bear on Myla’s pajamas) and then hot glued it onto the pink shirt!
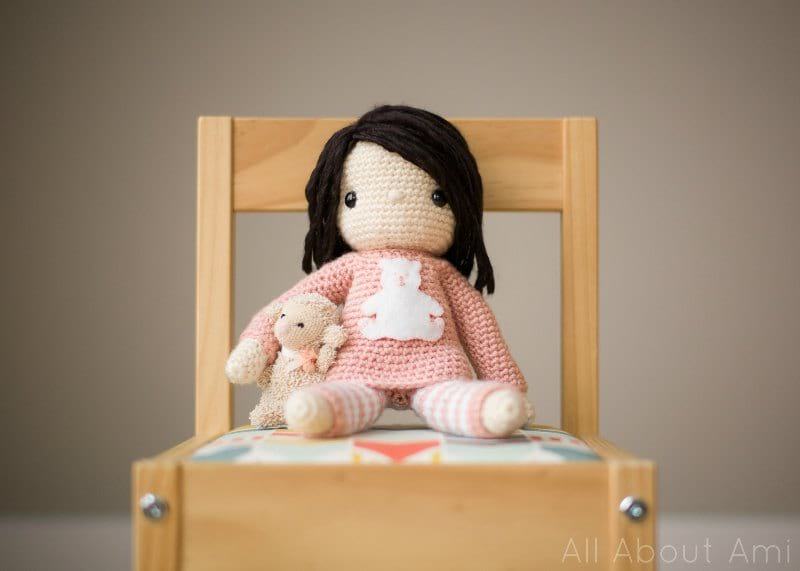
Here is our finished Myla Doll! Myla was sooo delighted to see this doll who looked just like her!
![]()
I can’t get enough of the matching pajamas! How sweet is 3 year old Myla pictured below with her mini me? The Myla Doll is such a perfectly huggable size!
![]()
Myla’s favourite stuffed animal is a lamb, so we posed the Myla Doll with this adorable little lamb (actually from my childhood)!
We styled and cut the hair of the doll to represent Myla’s hair at the time (around shoulder-length) and even parted her hair the same way! You could also give your doll various hairstyles such as braids, a headband, curly hair, or a ballerina bun!
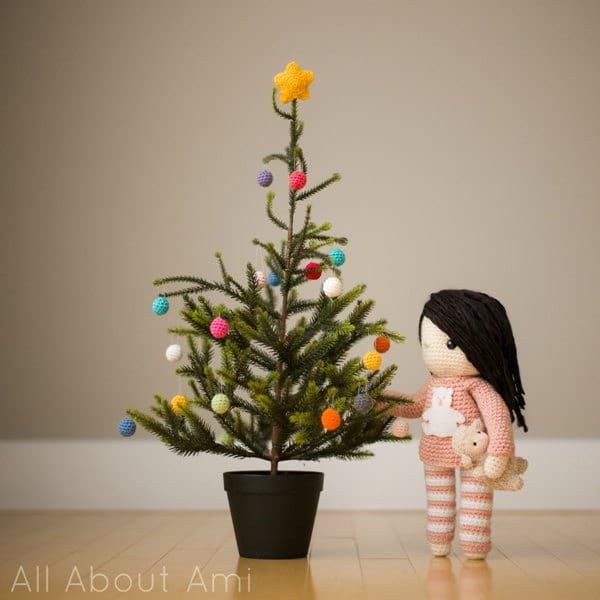
The year we finished the Myla Doll was also the year I made these colourful crochet ball ornaments for our mini tree (see blog post HERE)! How adorable is this photo? The Myla Doll holding her lamb stuffie beside the mini Christmas tree! Crochet cuteness galore!
Myla will always have this doll to cherish and to represent what she looked like when she first entered preschool! She has definitely outgrown these pajamas now, but I’m glad that we will always remember them through the Myla Doll!
![]()
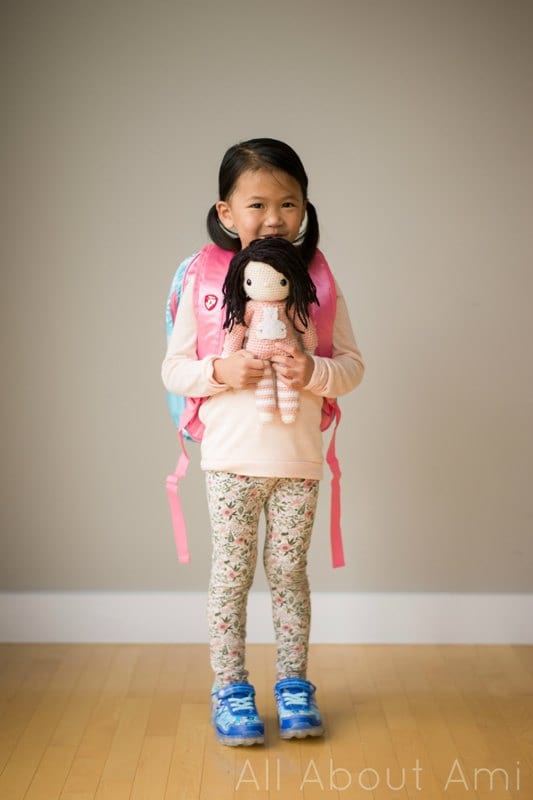
Myla just started kindergarten, so I thought it was fitting that we finally blog about the Myla Doll! Here she is at 4 (almost 5) years old with her special doll! Look how much she’s grown in height and how she looks like such a big girl now! Myla absolutely LOVED her first days of kindergarten and is excited for the year ahead! I must admit that I teared up a bit saying bye to her but I felt so incredibly proud of how brave she was as she happily hugged and kissed us good-bye and waved to us. She has grown so much physically, socially, and emotionally, and she is a very empathetic, bright, imaginative and creative child! I feel so thankful and blessed that I get to be her mother! Myla is a very caring big sister as well, and Brielle told me how much she missed Myla when she was at school!
“My Crochet Doll” is a beautiful book with so many colourful and whimsical images of the dolls in various poses and settings. The first portion of the book contains pictures to get you inspired to make your own doll as it showcases the wide variety of clothing options available. The latter portion of the book contains all the patterns and instructions! Keep in mind the following:
- This book is written in UK terminology, so a double crochet in UK terminology is actually a single crochet in US terminology. Your doll will turn out very differently if you accidentally use double crochets the whole time rather than single crochets!
- Use the yarn conversion chart in the book to determine which weight of yarn to use for the clothing and for the doll itself (e.g. lightweight DK, chunky, sport, etc). This yarn conversion chart can be found on page 65.
- It can be hard to interchange the crochet clothes of the doll as there is not much stretch. A few people recommended moving up a hook size to make the clothes a bit larger to make them easier to put on. Be very mindful of the yarn weight used as well as the recommended hook size when making each article of clothing (you may need to adapt the pattern if you are using a different yarn weight). You can also consider sewing clothes with fabric to mix materials.
- Some online reviews have mentioned that they noticed some errors in the book, such as with the Red Riding Hood Cape.
- To make the neck and head sturdier and to prevent the head from flopping down with the weight of the hair, some people added a chop stick or wooden dowel for support. Our Myla Doll has a very sturdy neck and head since we shortened the neck and added that extra strand of yarn in the last round of the neck. Her head is not wobbly at all!
- You can consider working the head top-down and inserting the hair as we did and secure the hair by adding fabric glue on the inside of the head. Adding too much hair might weigh the head down, so be wary about that. See other methods to add hair to dolls HERE!
- You can use the patterns as a guide and really customize your dolls!
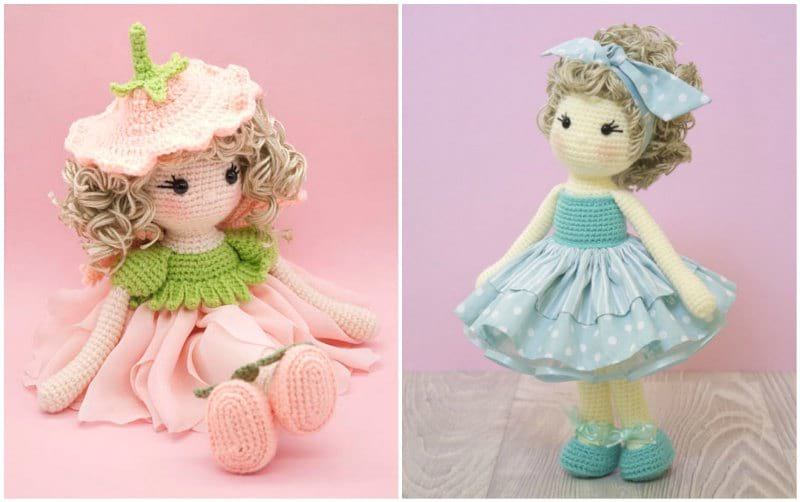
For more doll patterns, I would highly recommend Kali of The Friendly Red Fox‘s blog as she includes many doll tips and tricks as well. Erinna has also designed some beautiful crochet doll patterns, such as Ava-Rose the Flower Fairy and Emmy-Lou!
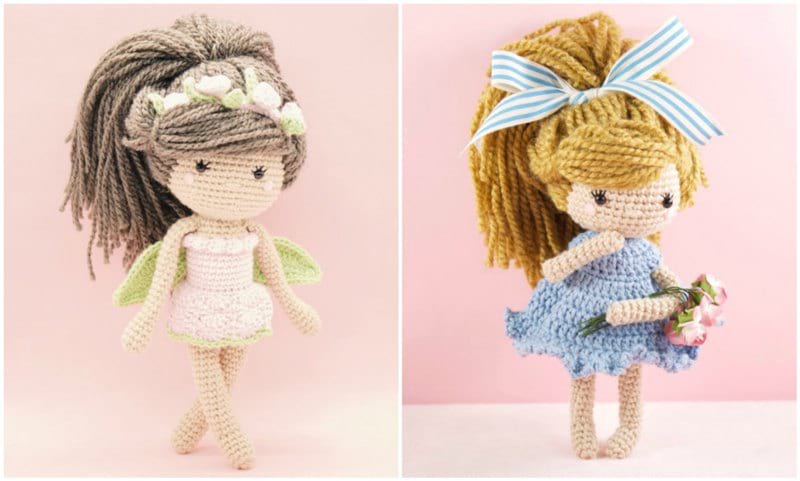
If you are interested in purchasing finished crochet dolls, I would recommend Rosemary’s gorgeous handmade creations as seen below and found in their shop HERE! They are such beautiful works of art as she combines crochet, knitting, and sewing! Rosemary does such an amazing job with the hair, and I am proud to own two of her creations HERE and HERE!
As I mentioned above, Ryan and I have actually designed our own doll too! We are excited to share our design with you in the coming months, and you can sign up for our newsletter HERE so you never miss any blog posts or free patterns! Check out the “My Crochet Doll” book HERE on Amazon if you’re interested in crocheting your own special dolls! You could also check your local libraries if you want to try out the books before purchasing it. It’s amazing how we can create our own customized dolls with specific skin and hair colours as it can sometimes be difficult finding dolls of different ethnic backgrounds in stores! These dolls make such unique and heartfelt gifts, particularly if you make them look like the recipient! Our plan is to crochet Myla and Brielle Dolls for the girls during big milestones in their lives (e.g. starting school, dance performances, graduation, etc) so that they can represent them at different stages in their lives! I’m already tearing up thinking about dolls wearing graduation gowns and caps! I am so thankful that we can create these special heirlooms for our girls!
Note: Special thank you to Rosemary & Erinna of Bubbles & Bongo for all the guidance and advice they gladly shared with me in crocheting this doll!