***You can purchase an AD-FREE PDF of this pattern on Etsy HERE and on LoveCrochet HERE! This beautifully formatted PDF includes the step-by-step pictures, the full pattern, and the “How to Add Hair to Crochet Dolls” tutorial, and is a total of 7 pages including the cover page!
Back in April 2017, we were gearing up for our family trip to California! We were excited to gather together with Ryan’s family and spend some quality time together in Disneyland, Santa Monica (where we took our Sea Breeze Sweater pictures) and Pasadena. We also arranged to meet some online friends who we greatly admired, and we had watched them on YouTube for a number of years: Christine Chen and Jenn Le! Christine is such an inspiring person who is a strong advocate for women, Asian Americans, and story telling. She has been a production director and now hosts the “Perfectly Imperfect” Podcast with Regina Fang as they share their stories as women openly and honestly. Christine also LOVES crafting and I thoroughly enjoyed watching her “XOXO Christine” show on YouTube where she showed us how to make a Sleepy Totoro, add pretty foils to digital prints and make fairy flower crowns. Christine also loves crocheting amigurumi! Jenn is an amazingly talented graphic designer and she does absolutely beautiful hand lettering- she also currently runs the social media of Wong Fu Productions. I love following her Instagram and seeing how she creatively combines photos with her lovely designs and hand lettering! Jenn also knits, so we all share a love of fiber arts! Needless to say, Ryan and I were very excited to meet both Jenn and Christine in person, and we wanted to make them both a special and unique gift. Ryan suggested making dolls that looked like them, and I questioned whether we had enough time (a couple of weeks). We thought it would be so meaningful, and thus we decided to dive right in and work on some new dolls amidst the other projects I was working on at the time (seaming up my Sea Breeze Sweater, Heartbreaker Shorts, Dash Shawl, and Chocolate Bunny). Ryan made the sketch below that I thought was so adorable!
![]()
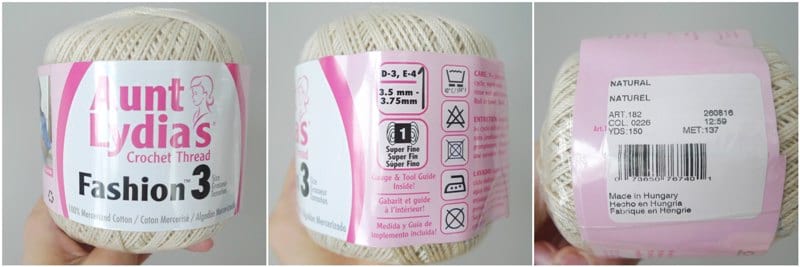
We wanted this doll to be very dainty and delicate, so we used crochet thread (Super Fine, Level 1 in yarn classification system). I found this Aunt Lydia’s Crochet Thread (Fashion size 3) in the colour “Natural” at Michael’s.
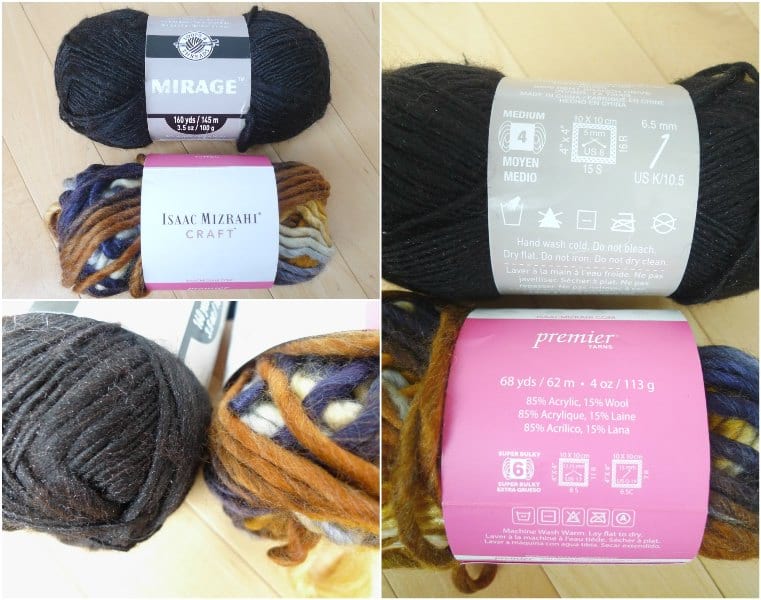
For the hair, we wanted to use thick and thin yarn, just as we did with the Myla Doll. Yarn with varying thicknesses help give the hair so much dimension and depth. For the black-haired doll, we used Loops & Threads Mirage in the colour “Black” (now discontinued, but I stocked up while they were on clearance). We could not find a purely yellow/blonde thick and thin yarn, but we found this Isaac Mizrahi Sutton yarn in the colour “East End”. We knew we could cut out the colours that we needed! Both these yarns were thicker than the yarn we used for the skin (worsted weight and super bulky).
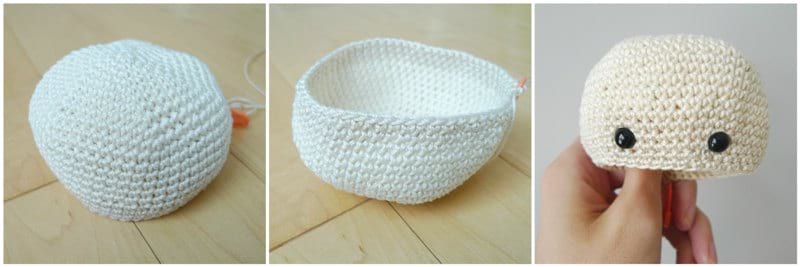
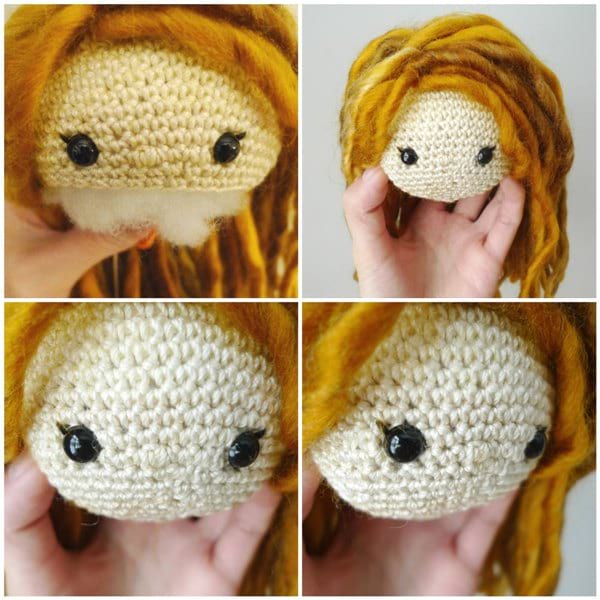
To begin, I crocheted a sphere with my 2 mm hook. When I was about 2/3 done, we placed the 7.5 mm safety eyes but did not secure them in place with the washer backing yet.
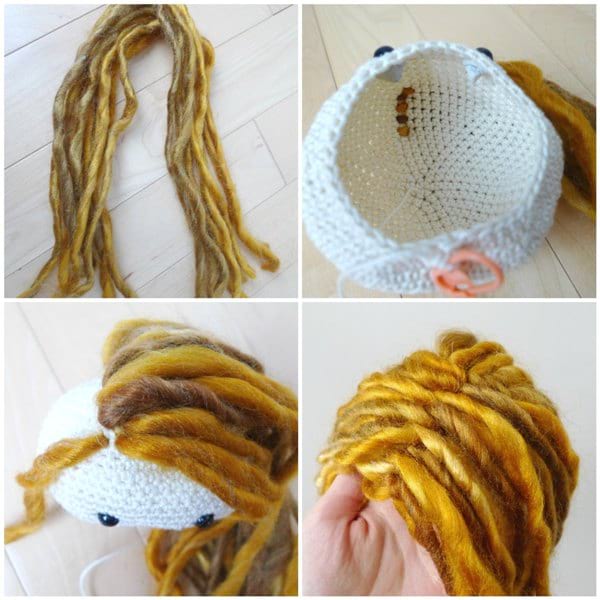
Ryan then added the hair. Please check out our full “How to Add Hair to Crochet Dolls” tutorial HERE! As you can see, we cut long strands of hair (at least double the length you want the final strands to be). Then Ryan carefully inserted the strands so both ends were sticking out of the scalp. He placed all the hair on one side, then filled in the other side, and then added hair at the back. The trick is to strategically place the hair so that it appears full without weighing the head down with an excessive amount of hair.
Ryan then checked the eye placement to see that he was happy with it. If he needed to, he could move the eyes in relation to the hair since he had not secured them in place yet. Once he was happy with the eye placement, he secured the backings and added eyelashes with black embroidery floss. He used the crochet thread and stitched on a little nose between the eyes.
I crocheted a little body which we then sewed onto the bottom of the head.
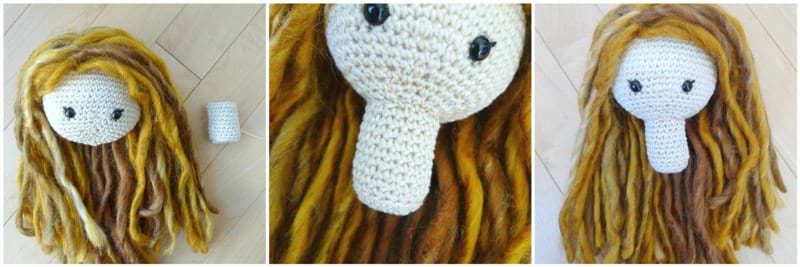
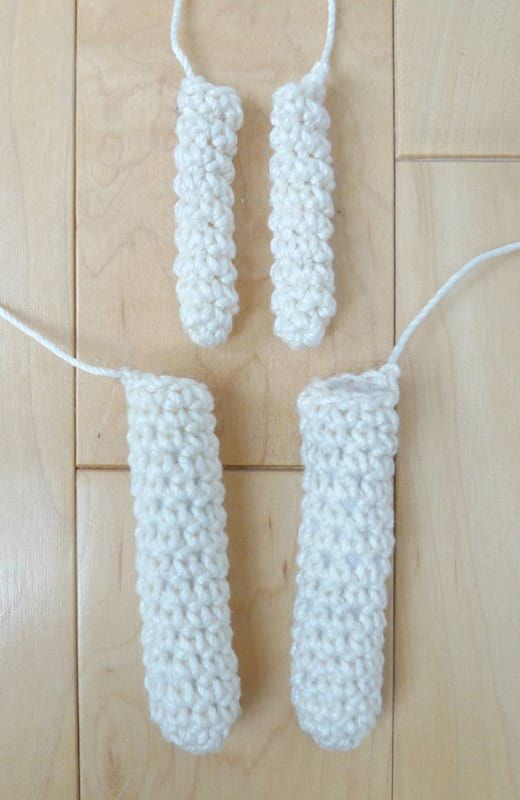
Next, I crocheted the legs and arms which were little tubes and stuffed them lightly (you can use your crochet hook or chopstick to push the stuffing down gently)!
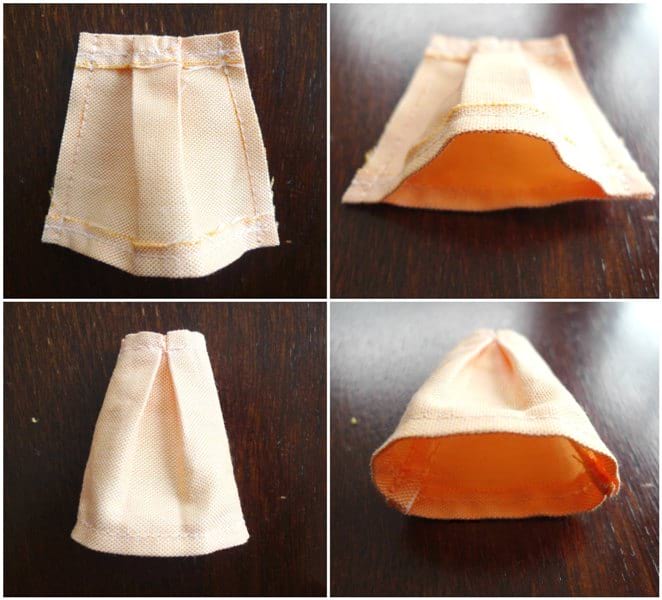
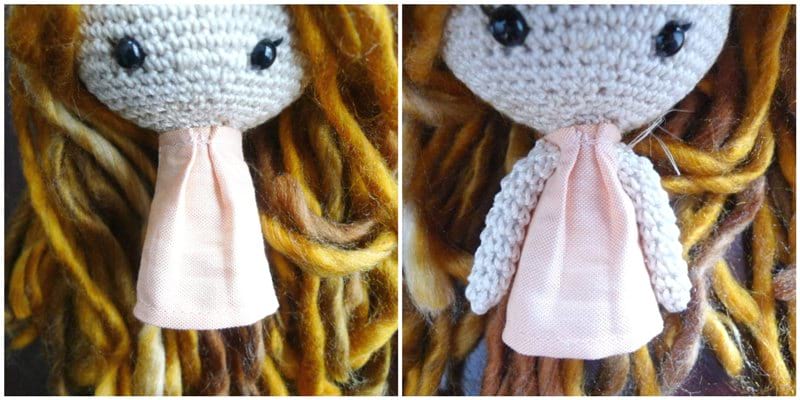
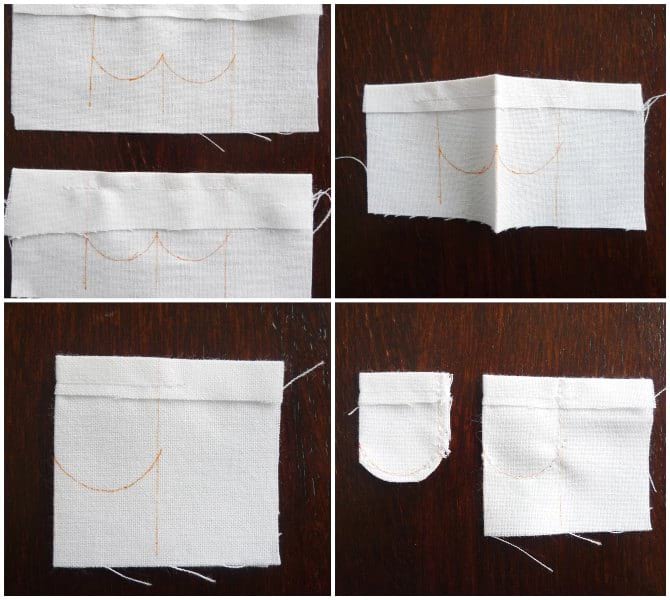
Mixing materials adds such a lovely touch to knit and crochet projects, so we decided to go with fabric dresses for a clean and modern look. Ryan cut these shapes as shown below and hemmed the edges. He ruched the front of the dress by folding the fabric towards the midline and seaming the top. Next, he sewed along the lines to secure the front part of the dress to the back part, leaving a tube in between. Ryan made a graphic showing the exact dimensions of the fabric that can be found in the pattern below! These pictures show you a general guideline of how we constructed our dress as your sizing may vary depending on the final size of your crochet doll (depends on gauge, what yarn and crochet hook you use for the body).

Ryan cut the excess fabric and inverted the dress to create this pretty tube!
We slipped the tube dress over the body and then attached the arms onto the sides of the dress using sewing thread. The thread runs through the arms, the dress, and the body to secure it all into place!
For the boots, Ryan hemmed the top edge and drew the shapes below. He then folded the sheet in half and cut out the shape, seaming along the edge. After he inverted the boot, they were ready to be slipped onto the legs! We attached the legs to the bottom of the body and then slipped the boots on. Ryan added a gold bead to each boot for a lovely detail as well!
As finishing touches, Ryan constructed some beautiful floral crowns using Christine’s tutorial (a miniature version haha). We thought it was so cute and special how these little dolls would have whimsical floral crowns just like Christine and Jenn did in their video! Ryan wrapped some floral wire into a circle and twisted the ends together. He then glued the flowers and leaves around the wire base, arranging them as he liked (you could also use floral tape as Christine does in her video).
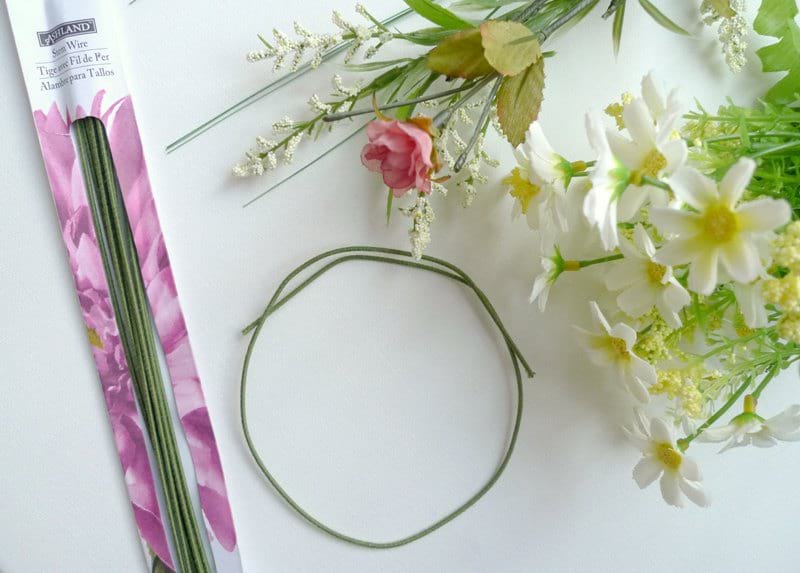
You can use whatever flowers you like with different shapes and colours, and arrange them how you please! Flower crowns add such a romantic touch!
![]()
We also sewed on some white beads to the top of the dress as an elegant necklace and used a pink Sharpie on the face for some rosy cheeks. After all the details were added, this is what our new whimsical doll looked like! This is the doll we made for Christine with her lighter hair and pretty peach dress!
![]()
This is the second doll we made for Jenn with her black hair and mint green dress! I love how we can personalize the colours of the hair and dresses since we make these beautiful dolls from scratch!
![]()
***************************************
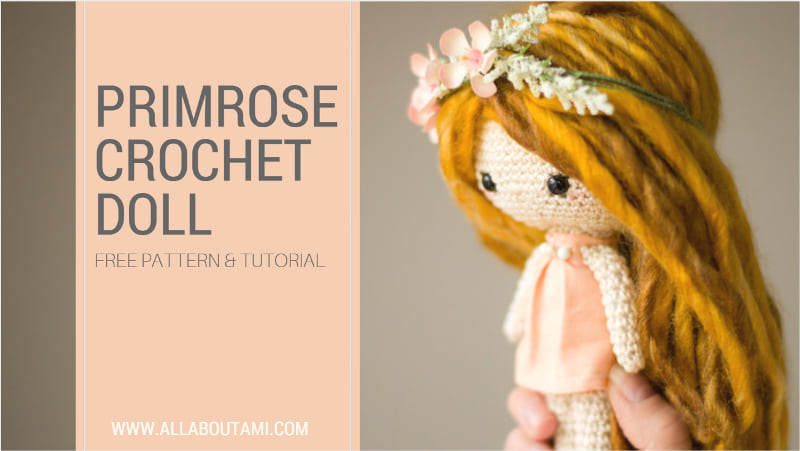
Here is the free pattern for our Primrose Crochet Dolls:
***You can purchase an INEXPENSIVE AD-FREE PDF of this pattern on Etsy HERE and on Craftsy HERE! This beautifully formatted PDF includes the step-by-step pictures, the full pattern, and the “How to Add Hair to Crochet Dolls” tutorial, and is a total of 7 pages including the cover page!
Materials:
- Crochet thread, Super Fine Yarn (level 1 in yarn classification) – I used Aunt Lydia’s Crochet Thread, Size 3, 100% Mercerized Cotton in the colour “Natural”
- Thick and thin novelty yarn for the hair – I used Loops & Threads Mirage in “Black” (since discontinued) and Isaac Mizrahi’s Sutton Yarn in “East End”
- 2 mm Clover Amour hook
- Yarn needle (bent tip helpful for attaching amigurumi parts- see HERE)
- fiberfill
- 7.5 mm safety eyes
- Black embroidery floss (for eyelashes)
- Clover lock ring stitch markers
- glue gun, fabric glue (for inside of head to secure hair into place)
- Fabric: patterned for dress, white for boots
- White sewing thread (for boots & dress)
- Pink sharpie (for cheeks)
- Beads: for pearl necklace and boot decorations
- Flower crown: floral/stem wire, plastic flowers and leaves
Note:
- I worked in continuous rounds (vs. joined rounds) unless otherwise indicated.
Finished Dimensions: 15 cm/6″ tall
HEAD
Round 1: 6 sc in Magic Ring. (6 sts)
R2: Inc around. (12 sts)
R3: *Sc 1, Inc*, rep 6 times. (18 sts)
R4: *Sc 2, Inc*, rep 6 times. (24 sts)
R5: *Sc 3, Inc*, rep 6 times. (30 sts)
R6: *Sc 4, Inc*, rep 6 times. (36 sts)
R7: *Sc 5, Inc*, rep 6 times. (42 sts)
R8: *Sc 6, Inc*, rep 6 times. (48 sts)
R9: *Sc 7, Inc*, rep 6 times. (54 sts)
R10: *Sc 8, Inc*, rep 6 times. (60 sts)
R11-19: Sc 60
R20: *Sc 8, Dec*, rep 6 times. (54 sts)
R21: *Sc 7, Dec*, rep 6 times. (48 sts)
R22: *Sc 6, Dec*, rep 6 times. (42 sts)
Place safety eyes between Rounds 19 and 20, about 7 stitches apart- do not fasten in place with washer backings yet (in case you need to move them later on in relation to the hair).
Using thick and thin yarn, add hair (see “How to Add Hair to Crochet Dolls” tutorial HERE).
Once you are happy with the hair placement, check the placement of the eyes. If you are happy with the positioning of the eyes, fasten them in place with the washer backings. Embroider small nose between eyes using crochet thread.
R23: *Sc 5, Dec*, rep 6 times. (36 sts)
R24: *Sc 4, Dec*, rep 6 times. (30 sts)
R25: *Sc 3, Dec*, rep 6 times. (24 sts)
Stuff head with fiberfill.
R26: *Sc 2, Dec*, rep 6 times. (18 sts)
R27: *Sc 1, Dec*, rep 6 times. (12 sts)
R28: *Dec*, rep 6 times. (6 sts)
Fasten off and weave in end.
BODY
Round 1: 6 sc in Magic Ring. (6 sts)
R2: Inc around. (12 sts)
R3: *Sc 1, Inc*, rep 6 times. (18 sts)
R4: Sc 18
R5: In back loops only, Sc 18.
R6-13: Sc 18.
Fasten off and leave long end for sewing. Stuff body.
ARMS (make 2)
Round 1: 6 sc in Magic Ring. (6 sts)
R2-9: Sc 6
Fasten off and leave long end for sewing. Stuff lightly.
LEGS (make 2)
Round 1: 6 sc in Magic Ring. (6 sts)
R2: *Sc 1, Inc*, rep 3 times. (9 sts)
R3-16: Sc 9
Fasten off and leave long end for sewing. Stuff lightly.
Sewing Dress & Boots:
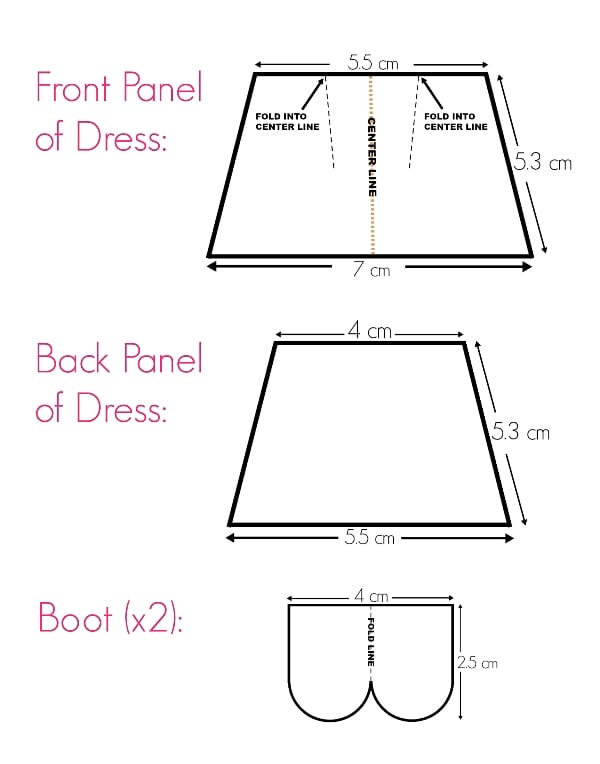
- Dress: Using template above as a guideline for sizing, cut strips of fabric and hem edges. Note that the dimensions shown above are the FINAL dimensions of our dress, so you need to make the shapes larger, leaving about a 1 cm/0.5″ seam allowance. You may need to adjust your sizing depending on the final size of your crochet doll (may vary depending on gauge, what yarn and hook size you use for the body). Draw shapes and fold fabric towards center line. Sew along edges to secure front and back parts of dress, leaving a tube in between. Cut along lines, leaving a seam allowance of about 1 cm/0.5″. Invert tube to form dress.
- Boots: Hem top edge of fabric and draw shape. Fold fabric in half and sew along lines. Leave seam allowance and cut out shapes- invert to form boots.
Assembly:
- Attach body onto bottom of head.
- Slip tube dress over body.
- Place arms on either side of the dress and use sewing thread to sew arms and dress onto body.
- Sew legs onto bottom of body.
- Sew gold bead onto each boot. Place boots onto bottom of legs.
Details:
- Add pink blush to the cheeks.
- Sew three beads onto collar to make necklace.
- Create flower crown by wrapping floral wire into a circle, twisting the ends together. Place flowers onto the wire circle, securing them in place with floral tape (wrap stems to wire circle) or with hot glue. See Christine’s YouTube video HERE for guidance!
****************
I am so in love with our Primrose Crochet Dolls! I adore the name “Primrose” as suggested by a reader since it evokes a romantic feeling and I wanted to incorporate something floral-related since the flower crowns are such a special feature!
![]()
The extra long flowing hair, bead details, pretty fabric dresses and flower crowns all add such lovely details to this dainty doll!
![]()
Every time Ryan showed me his progress on adding details to the Primrose Crochet Dolls, I couldn’t stop squealing! You could also braid her hair or give her ponytails!
![]()
When it was time to package these special handmade gifts, we found these beautiful hard-cover boxes at Michaels! They were the perfect size to carefully transport and protect our Primrose Crochet Dolls!
![]()
We had such an amazing time meeting up with Jenn and Christine in California, and we even had an unexpected craft exchange as we all brought handmade presents for each other! Christine sewed the Flower Crown and Rainbow Glitter Kitties that the girls are holding and Jenn gave me this beautiful foil print that she hand lettered! Jenn just actually launched her own Etsy shop to sell her gorgeous hand lettered foil prints- check it out HERE! Our Primrose Crochet Dolls are so whimsical and dreamy, and I feel like they perfectly represent us as dreamers, using our crafty and creative talents to pursue what we are passionate about and encouraging others to do the same! Time went by so quickly as we chatted, and Jenn and Christine are both so genuine, humble, and kind people!
![]()
We hope you enjoy creating your own Primrose Crochet Dolls and choosing their hair colours, dresses, and arranging their flower crowns! It is a very special project, and I am actually in the midst of creating one for myself to keep! Let me know if you will be making one or perhaps a couple in the future and who they will be based on! Happy doll making!
This pattern is an original pattern by Stephanie Lau of All About Ami (November 2017). Please do not claim this pattern as your own. If you wish to share this pattern, you may link to this pattern but please do not reprint it on your site. You may keep a copy for your own personal use but please DO NOT sell the pattern or distribute it.
You may sell products made from this pattern but please clearly credit the design to me, Stephanie Lau of All About Ami, and provide a link to my blog www.AllAboutAmi.com. Permission is NOT granted for mass production or factory manufacturing of any kind. Thank you for being respectful and for your understanding!