***You can purchase an INEXPENSIVE AD-FREE PDF of this pattern on Etsy HERE. The printable PDF with step-by-step pictures has been condensed into a total of 4 pages including the cover page! You can follow along with my full step-by-step blog post HERE to see more process and detailed photos!
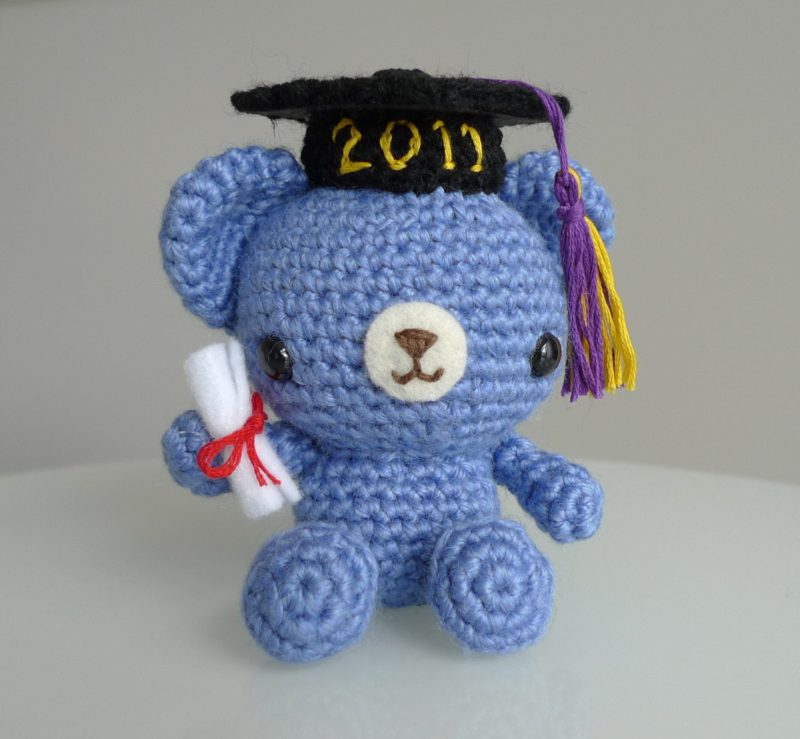
Crochet your own amigurumi Graduation Teddy to help those special graduates in your life commemorate their big milestone! Personalize this teddy by using their favourite colour, year of graduation and school colours for the tassel!
Materials:
- Blue and black worsted weight yarn
- Various shades of embroidery floss (brown for the nose, red for the scroll, purple and yellow for the tassel)
- 2.00 mm Clover Amour crochet hook
- Yarn needle (bent tip helpful for attaching amigurumi parts- see HERE)
- fiberfill
- 9 mm safety eyes
- White felt (for the scroll)
- Glue gun
- Black cardboard/hard paper (base of mortarboard)
Note: I worked in continuous rounds (vs. joined rounds).
HEAD
R1: 6 sc in magic ring. (6 sts)
R2: 2 sc in each sc around. (12 sts)
R3: *Sc 1, 2 sc in next sc*, rep 6 times. (18 sts)
R4: *Sc 2, 2 sc in next sc*, rep 6 times. (24 sts)
R5: *Sc 3, 2 sc in next sc*, rep 6 times (30 sts)
R6: *Sc 4, 2 sc in next sc*, rep 6 times (36 sts)
R7: *Sc 5, 2 sc in next sc*, rep 6 times (42 sts)
R8-13: Sc 42
R14: *Sc 5, dec 1*, rep 6 times (36 sts)
R15: *Sc 4, dec 1*, rep 6 times (30 sts)
R16: *Sc 3, dec 1* rep 6 times (24 sts)
Place 9 mm safety eyes. Begin stuffing head.
R17: *Sc 2, dec 1*, rep 6 times. (18 sts)
R18: *Sc 1, dec 1*, rep 6 times. (12 sts)
Stuff head firmly.
R19: *Dec 1*, rep 6 times. (6 sts)
Fasten off and weave in end. Cut circle out of felt and embroider nose with embroidery floss. Glue onto head between eyes.
EARS (make 2)
R1: 6 sc in magic ring. (6 sts)
R2: 2 sc in each sc around. (12 sts)
R3: *Sc 1, 2 sc in next sc*, rep 6 times. (18 sts)
R4-6: Sc 18.
Fasten off and leave long end for sewing. Sew open end together. Sew ontop of head.
BODY
R1: 6 sc in magic ring. (6 sts)
R2: 2 sc in each sc around. (12 sts)
R3: *Sc 1, 2 sc in next sc*, rep 6 times. (18 sts)
R4: *Sc 2, 2 sc in next sc*, rep 6 times. (24 sts)
R5-9: Sc 24
R10: *Sc 2, dec 1*, rep 6 times. (18 sts)
Stuff firmly. Fasten off and leave long end for sewing. Sew body to head.
ARMS (make 2)
R1: 9 sc in magic ring. (9 sts)
R2: Sc 9. (9 sts)
R3: *Sc 1, dec 1*, rep 3 times (6 sts)
R4-6: Sc 6
Stuff firmly. Fasten off and leave long end for sewing. Attach to body.
LEGS (make 2)
R1: 6 sc in magic ring. (6 sts)
R2: 2 sc in each sc around. (12 sts)
R3: *Sc 1, 2 sc in next sc*, rep 6 times. (18 sts)
R4: Through back loops only, *Sc 1, dec 1*, rep 6 times. (12 sts)
R5: Sc 12
R6: *Dec 1*, rep 6 times (6 sts)
R7-8: Sc 6
Stuff firmly. Fasten off and leave long end for sewing. Attach to bottom of body.
TAIL
R1: 6 sc in magic ring. (6 sts)
R2: Sc 6
Fasten off and leave long end for sewing. Place tail in various positions in bottom-back of body to see which placement is best (to give balance).
MORTARBOARD:
The mortarboard consists of 4 parts: (1) Square board, (2) Skull cap, (3) Centre circle, (4) Tassel.
(1) Square board:
Using black yarn,
Ch 12
R1: Sc 11, starting in second ch from hook, turn. (11 sts)
R2-11: Sc 11, turn. (11 sts)
Fasten off and weave in end.
(2) Skull cap:
Using black yarn,
Ch 23, join first and last sts with sl st to form a ring.
R1-3: Sc 23.
Fasten off and leave long end for attaching to head.
(3) Centre Circle:
Using black yarn,
R1: 6 sc in magic ring (6 sts).
Fasten off and leave long end for sewing.
(4) Tassel:
See my tassel tutorial to make a personalized tassel using your graduate’s school colours!
Assembly of mortarboard:
- Sew centre circle ontop of the square board.
- Knot end of tassel around centre circle. Pull ends through square board to hide them.
- Measure and cut square piece of black cardboard/hard paper to fit square base. Glue gun paper piece to the square board (to make it firm and preventing ends from curling up/waving).
- Embroider year of graduation onto skull cap.
- Sew skull cap onto head, ensuring year of graduation is centered.
- Glue gun skull square board onto skull cap.
DIPLOMA SCROLL
Cut small piece of white felt and roll it up. Use glue gun to secure its shape. Tie red embroidery floss around scroll in a bow. Attach to Graduation Teddy’s hand by sewing or glue gun.
This pattern is an original pattern by Stephanie Lau of All About Ami (June 2011). Please do not claim this pattern as your own. If you wish to share this pattern, you may link to this pattern but please do not reprint it on your site. You may keep a copy for your own personal use but please DO NOT sell the pattern or distribute it.
You may sell products made from this pattern but please clearly credit the design to me, Stephanie Lau of All About Ami, and provide a link to my blog www.AllAboutAmi.com. Permission is NOT granted for mass production or factory manufacturing of any kind. Thank you for being respectful and for your understanding!